IVS 100/40 IVS 100/40 Lp IVS 100/55 Lp IVS 100/75 Lp
99898210 (01/25)
99898210 (01/25)
Read these original instructions before using your device for the first time, adhere to the instructions contained therein and store them for later reference or subsequent owners.
Be sure to read the safety instructions no. 5.956-249.0 prior to the initial startup.
If the operating instructions and safety instructions are not observed, the device can be damaged and dangers could arise for users and other persons.
Notify the dealer immediately in the case of shipping damage.
Indication of an imminent threat of danger that will lead to severe injuries or even death.
Indication of a potentially dangerous situation that may lead to severe injuries or even death.
Indication of a potentially dangerous situation that may lead to minor injuries.
Indication of a potentially dangerous situation that may lead to damage to property.
Observe the applicable safety instructions for the materials being vacuumed.
The device must not be used or stored outdoors in wet conditions.
In case of longer breaks in operation and after use, switch off the device at the power switches and unplug the mains plug.
Surface temperatures can rise to 95° C during normal operation.
Risk of injury and material damage when vacuuming inflammable materials, or in the case of a short-circuit or other electrical faults
Danger of inhalation of gases hazardous to health, danger of electric shock, danger of burns.
In the event of an emergency, switch off the device and unplug the mains plug.The device is intended for:
Wet and dry cleaning of floor and wall surfaces
Vacuuming dry, non-flammable dust particles from the machine
Vacuuming moist and liquid substances
Commercial use, e.g.in hotels, schools, hospitals, factories, shops, offices, and rental companies
Industrial usee.g. in storage and production areas
The device's correct function is only guaranteed when using suction hose nominal widths DN40, DN50 and DN70.
A device with a waste hose system is not suitable for wet vacuum cleaning.
Any other use constitutes improper use.
The device is not suitable for:
Vacuuming up hazardous dust
 The packing materials can be recycled. Please dispose of packaging in accordance with the environmental regulations.
 Electrical and electronic devices contain valuable, recyclable materials and often components such as batteries, rechargeable batteries or oil, which - if handled or disposed of incorrectly - can pose a potential danger to human health and the environment. However, these components are required for the correct operation of the device. Devices marked by this symbol are not allowed to be disposed of together with the household rubbish.
Current information on content materials can be found at: www.kaercher.de/REACH
Only use original accessories and original spare parts. They ensure that the appliance will run safely and fault-free.
Information on accessories and spare parts can be found in the Service area at www.kaercher.com.
Please note:
No accessories are included in the scope of delivery. The accessories must be ordered separately depending on the application.
The correct function of the device is only guaranteed by the prescribed nominal width of the suction hose (see chapter Technical data).
Spare parts and accessories are available from your dealer or from your KÄRCHER branch.
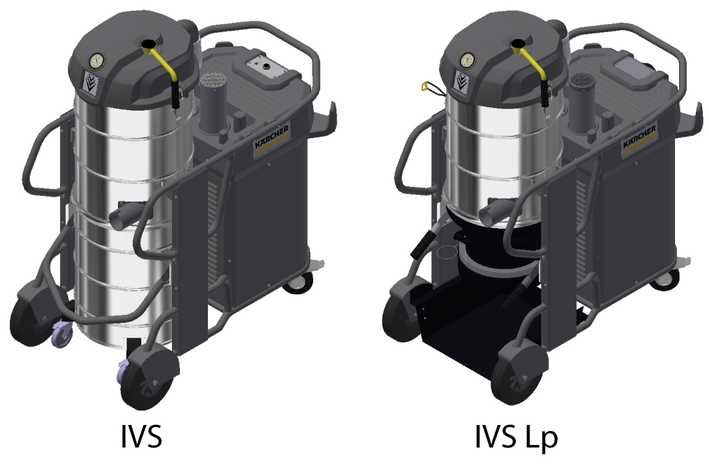
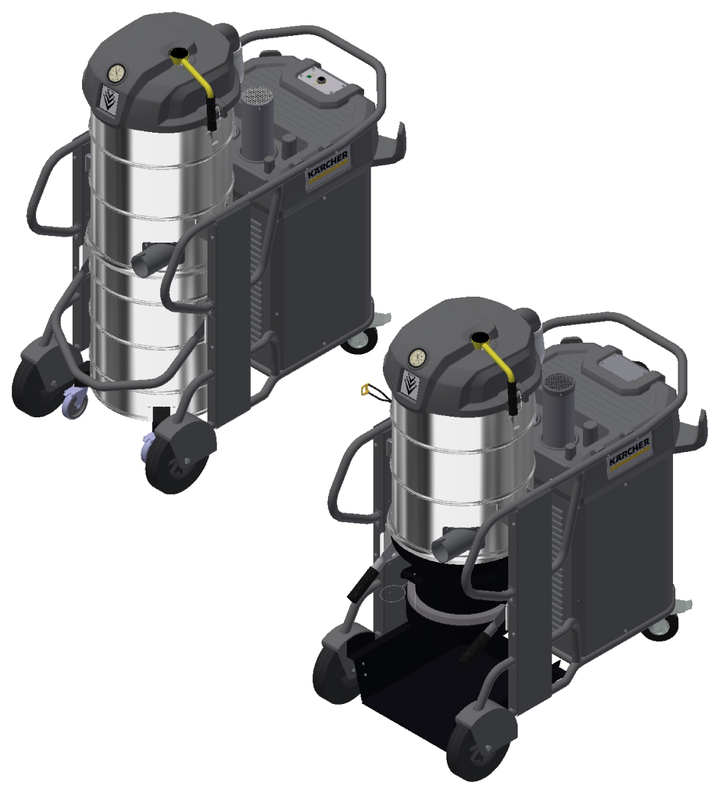
The devices of the IVS model series are equipped with a vacuum cleaner waste container for the intake of vacuumed material.
The IVS devices with the Lp addition differ in that they are equipped with a waste hose system. The devices with a waste hose system are not suitable for wet vacuum cleaning.
The differences of this disposal system in comparison to the device series with a vacuum cleaner waste container, as well as special operation, will be described separately in these instructions.
Check which disposal system your device is equipped with before use.
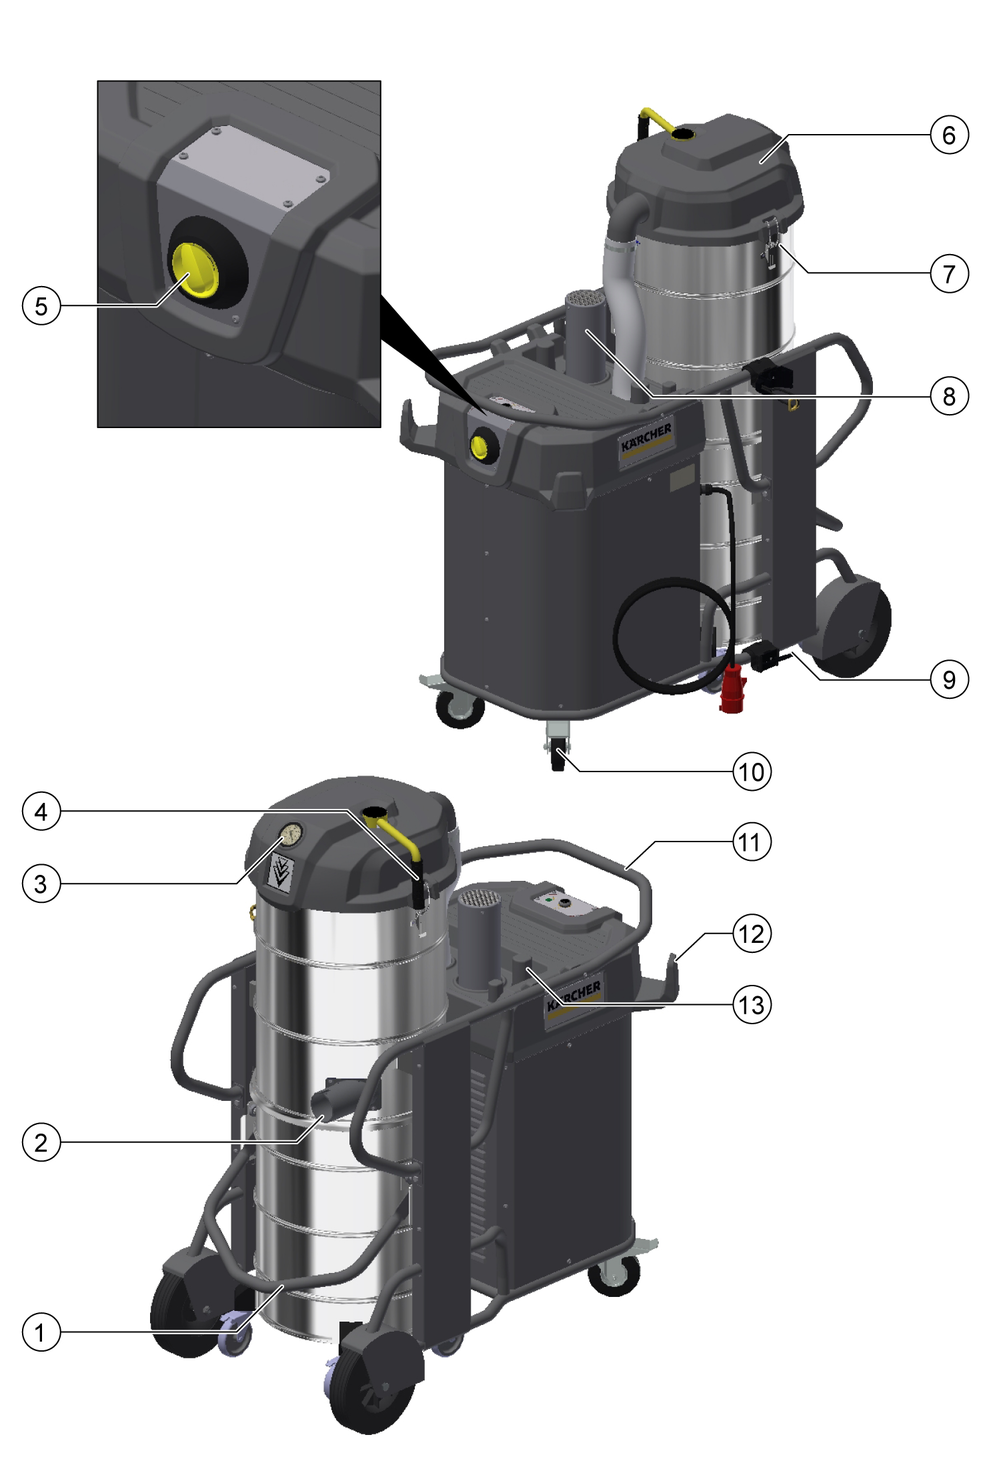
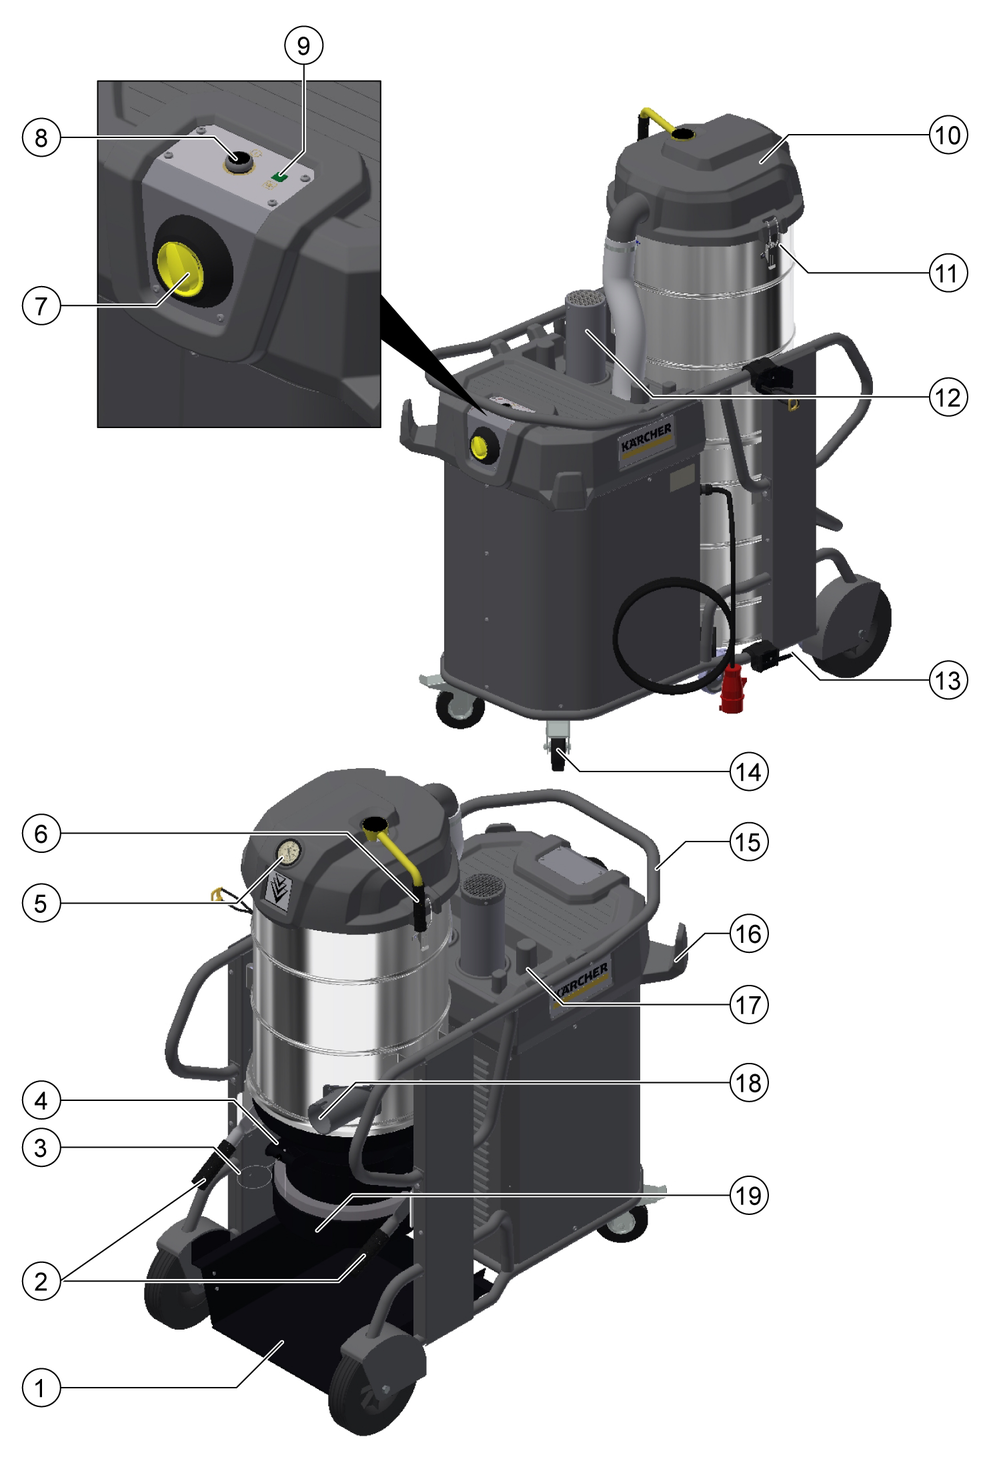
Green |
|---|
Flash codes for programming the remote control (see wireless remote control). |
The following devices are equipped with a radio receiver for the optionally available wireless remote control:
IVS 100/55 Lp
IVS 100/75 Lp
The teach-in and operation of the device with the wireless remote control is described in the operating instructions of the remote control.
Missing filter element
Damage to the suction motor
Do not vacuum without a filter element.Exceeding the grid impedance
Electrical shock in the event of a short-circuit
The maximum permissible mains grid impedance at the electrical connection point (see Technical data) must not be exceeded.Contact your electricity supplier in the case of any uncertainties regarding the mains grid impedance at your electrical connection point.Bring the device into the working position.
Secure the device with the parking brakes.
Insert the suction hose into the suction connection.
Fit the desired accessory (not included in the scope of delivery) onto the suction hose.
Ensure that the vacuum cleaner waste container (IVS model series) or the disposal system with waste hose (IVS Lp model series) is properly inserted.
IVS model series
After vacuuming moist or liquid substances, observe the notes in chapter Switching from wet to dry vacuuming.
IVS Lp model series
The devices in the IVS Lp model series are equipped with a waste hose system. The devices are not suitable for wet vacuum cleaning.
Danger due to fine dust entering
Risk of damage to the suction motor.
Never remove the filter element when vacuuming.Wet vacuuming with dust bag
Device damage
Do not use a dust bag when vacuuming wet.A dust bag can be inserted in the vacuum cleaner waste container to allow dust-free emptying of the device. Do not use the dust bag for wet vacuum cleaning!
Secure the device with the parking brakes.
Pull the bow handle up.
The vacuum cleaner waste container is unlocked and lowered.
Pull the vacuum cleaner waste container out of the device with the bow handle.
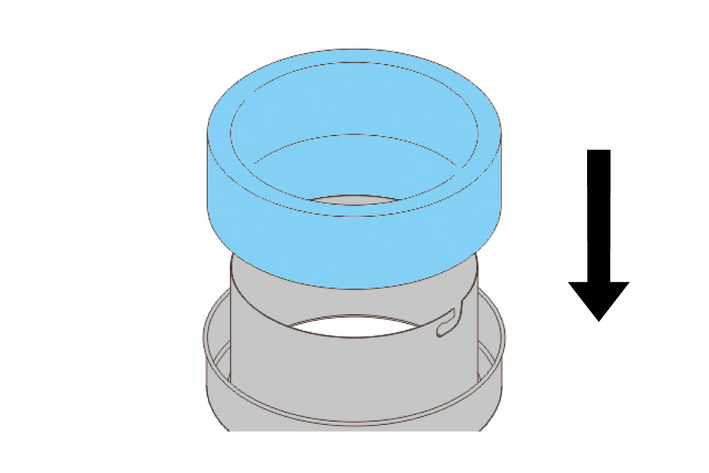
Fit the dust bag in the vacuum cleaner waste container and carefully position it against the container wall and the container floor.
Fold the edge of the dust bag over the edge of the vacuum cleaner waste container to the outside.
Fit the vacuum cleaner waste container and lock it with the bow handle.
Secure the device with the parking brakes.
Pull the bow handle up.
The vacuum cleaner waste container is unlocked and lowered.
Pull the vacuum cleaner waste container out of the device with the bow handle.
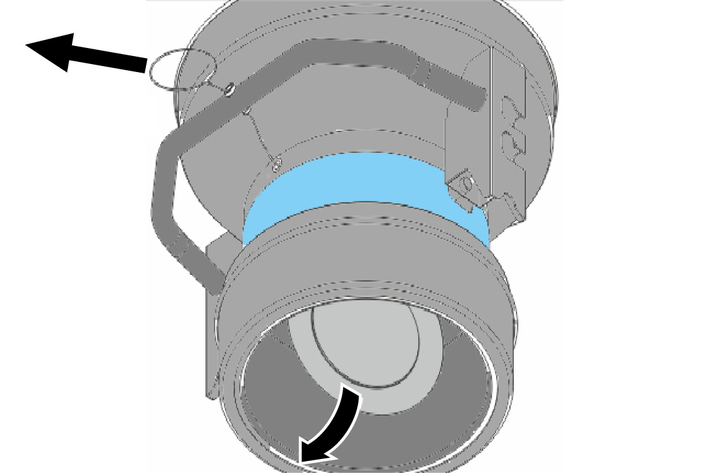
Turn up the dust bag.
Seal the dust bag tightly with the cable tie.
Remove the dust bag.
Dispose of the dust bag in accordance with statutory regulations.
Fit the vacuum cleaner waste container and lock it with the bow handle.
Secure the device with the parking brakes.
Remove the sheet metal tray.
Pull the unlocking lever / lowing mechanism upwards.
The disposal system is unlocked and lowered.
Pull out the disposal system by the handle.
Remove all 4 loops of the waste hose (length 22 m).
Open the holder by turning it to the left and pull it out downwards.
Fit the waste hose.
Push the holder in and close it by turning it to the right.
Pull the waste hose 40-50 cm down.
Seal the end of the waste hose with a cable tie.
Fitting the disposal system
Risk of crushing
Never place your hands between the disposal system and the spacer when locking.Insert the disposal system and lock with the unlocking levers / lowering mechanism.
Fit the sheet metal tray.
Risk of damage if the vacuum cleaner waste container overflows
The vacuum cleaner waste container can fill within a few seconds and overflow when vacuuming large amounts of liquids.
Continuously monitor the filling level.Remove the dust bag before wet vacuum cleaning (see chapter Removing the dust bag).
On completion of wet vacuum cleaning:
Dry the filter.
Clean the waste container with a moist cloth and dry it off.
Switching from wet to dry vacuuming
Risk of damage to the filter
Do not vacuum dry dust with a wet filter element because this clogs the filter and can make it unusable.Allow the wet filter to dry completely or replace it with a dry filter before using the device for dry vacuuming.
Replace the filter if necessary.
Connect the mains plug.
Turn the on/off switch to "1".
Only IVS 100/55 Lp and IVS 100/75 Lp
Press the "Switch-on device" button.
Regularly check the filling level in the vacuum cleaner waste container, since the device does not switch off automatically.
If necessary, empty the vacuum cleaner waste container (see chapter Emptying the vacuum cleaner waste container).
If necessary, clean the filter (see chapter Cleaning the filter) or change/replace the filter (see chapter Changing/replacing the filter).
Perform the vacuuming process.
The suction material does not fall into the waste hose until the device is switched off.
Regularly check the filling level in the waste hose because the device does not switch off automatically.
With light suction material or in the case of clogging, pull the sheathed cable to open the flap at the outlet (only possible when the device is switched off).
Pull the waste hose down somewhat.
Close the waste hose using 2 cable ties at a spacing of 10 cm.
Cut the waste hose between the cable ties.
Dispose of the waste bag in accordance with statutory regulations.
With light suction material, the length of the waste bag can be up to 2 m without the waste bag tearing.
A pressure gauge showing the vacuum inside the device is mounted on the front of the device. The filter must be cleaned when the maximum vacuum (see table) is reached (see chapter Cleaning the filter). This value depends on the device performance and the suction hose used. If the vacuum is not significantly reduced by dedusting, the filter must be replaced (see chapter Changing/replacing the filter).
Exceeding the maximum vacuum
Suction loss
If the specified value is exceeded, the air speed in the suction hose drops below 20 m/s. Clean or replace the filter.DN40 | DN50 | DN70 | |
|---|---|---|---|
IVS 100/40 | 16.5 kPa | 16.5 kPa | 15.5 kPa |
IVS 100/55 | 23.0 kPa | 22.0 kPa | 15.5 kPa |
IVS 100/75 | 27.0 kPa | 25.0 kPa | 20.0 kPa |
The filter must be cleaned if the pressure gauge shows the maximum vacuum (see chapter Reading the minimum volumetric flow).
Turn the on/off switch to "0".
Move the filter cleaning lever back and forth several times, at least 5 times.
Switch off the device at the ON/OFF switch.
Pull out the mains plug.
Remove the accessories (not included in the scope of delivery).
Remove the accessories and, if necessary, flush with water and allow to dry.
IVS model series: Empty the vacuum cleaner waste container (see chapter Emptying the vacuum cleaner waste container).
Remove the filter for drying if wet suction material has been vacuumed.
Vacuum the inside and outside of the device and clean with a moist cloth.
The vacuum cleaner waste container must be emptied when it is has filled up to approx. 3 cm below the upper edge.
Regularly check the filling level in the vacuum cleaner waste container, since the device does not switch off automatically.
Switch off the device.
Secure the device using the parking brakes on the steering rollers.
Pull the bow handle up.
The vacuum cleaner waste container is unlocked and lowered.
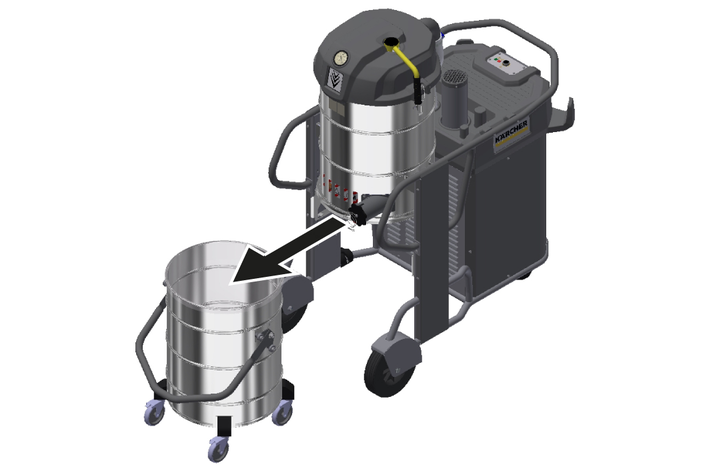
Pull the vacuum cleaner waste container out of the device with the bow handle.
The vacuum cleaner waste container can be lifted at the handle using a crane. The maximum load for transport by crane is 50 kg.
Exceeding the permissible total weight
Risk of injury and damage
Observe the total weight of the vacuum cleaner waste container when transporting it by crane.Do not overload the container.Observe the valid instructions for crane operation.Empty the vacuum cleaner waste container.
If necessary, replace the dust bag (see chapter Replacing the dust bag).
Insert the vacuum cleaner waste container back into the device in the reverse order.
Failure to observe the weight
Risk of injury and damage
Be aware of the weight of the device during transport and storage.When transporting in vehicles, secure the device against slipping and tipping over according to the applicable guidelines.
Failure to observe the weight
Risk of injury and damage
Be aware of the weight of the device during storage.Store the device indoors only.
Danger of injury
Danger of the device unintentionally starting and danger of electric shock
Switch off the device and unplug the mains plug before performing any work on the device.Have the vacuum cleaner regularly inspected according to the respective national accident prevention regulations. Maintenance work as specified by the manufacturer must be performed by a technically qualified person at the specified regular intervals and in accordance with the applicable regulations and safety requirements. Work on electrical components may only be performed by a qualified electrician. Please contact a KÄRCHER branch office if you have any questions.
No periodic maintenance intervals are specified for this device. The following maintenance is to be performed as necessary:
Wash the filter.
Change the filter.
Replace the filter.
The filter can be washed out under running water.
Risk of damage
Do not use washing agents or bleach. Only insert the filter into the device when it is completely dry.Damage to the skin, lungs and eyes through fine dust
Emission of fine dust when changing the filter
Wear the prescribed protective clothing when changing the filter. Change the filter in a suitable maintenance area.Dispose of the filter in accordance with the statutory regulations.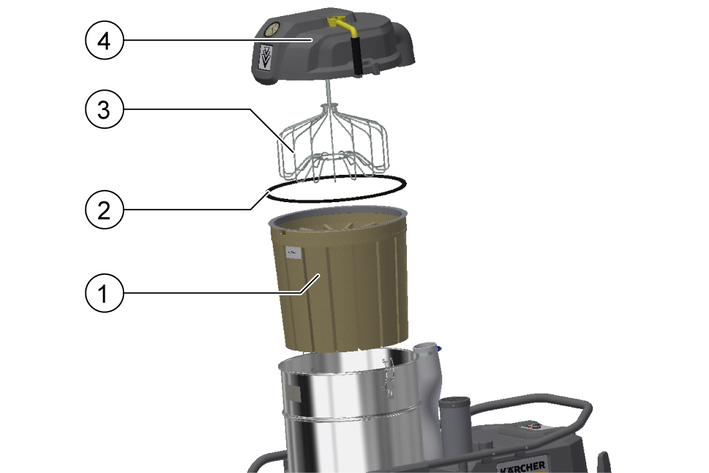
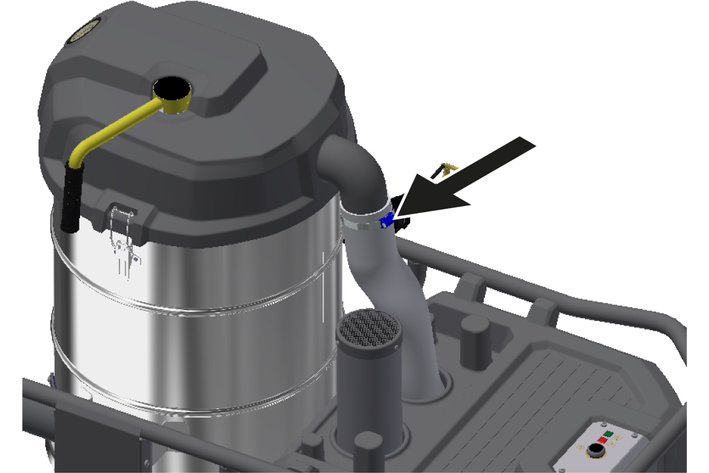
Remove the hose clamp on the connection hose. Use a screwdriver for this task.
Open the locks.
Remove the filter chamber lid.
Remove the filter.
Check the sealing ring for damage.
Insert the new filter in the reverse sequence and take care to ensure that the filter spreader is aligned correctly in the filter bag.
Secure the device with the parking brakes.
Pull the bow handle up.
The vacuum cleaner waste container is unlocked and lowered.
Pull the vacuum cleaner waste container out of the device with the bow handle.
Turn up the dust bag.
Seal the dust bag tightly with the cable tie.
Remove the dust bag.
Dispose of the dust bag in accordance with statutory regulations.
Fit the new dust bag in the vacuum cleaner waste container and carefully position it against the container wall and the container floor.
Fold the edge of the dust bag over the edge of the vacuum cleaner waste container to the outside.
Fit the vacuum cleaner waste container and lock it with the bow handle.
Unintentional start-up of the device / electric shock
Unintentional start-up of the suction motor can cause injuries. Voltage present on electrical parts can cause an electric shock.
Switch off the device and unplug the mains plug before performing any work on the device.Have all checks and work on electrical parts performed by an qualified technician.The device must be switched off immediately in the event of a malfunction. The malfunction must be eliminated before switching the device on again.
If the malfunction cannot be corrected, the device must be checked by the Customer Service department.
The motor (suction turbine) does not start up
Cause:
No electrical voltage present
Remedy:
Check the socket and the power supply fuse.
Check the mains cable and the mains plug of the device.
Cause:
Suction turbine rotating in the wrong direction

Remedy:
Swap the pins on the unit plug.
Suction power slowly reduces
Cause:
Filter, nozzle, suction hose or suction pipe clogged.
Remedy:
Check the accessory for clogging.
Remedy:
Clean the accessory if necessary.
Remedy:
Clean the filter.
Remedy:
Replace the filter if necessary.
Escaping dust when vacuuming
Cause:
Filter not correctly fastened or faulty.
Remedy:
Clean the filter and insert it correctly.
Remedy:
Check the filter for faults and replace if necessary.
The warranty conditions issued by our relevant sales company apply in all countries. We shall remedy possible malfunctions on your appliance within the warranty period free of cost, provided that a material or manufacturing flaw is the cause. In a warranty case, please contact your dealer (with the purchase receipt) or the next authorised customer service site.
Further information can be found at: www.kaercher.com/dealersearch
Further warranty information (if available) can be found in the service area of your local Kärcher website under "Downloads".
We hereby declare that the product named below complies with the relevant provisions of the directives and regulations listed. This declaration is invalidated by any changes made to the product that are not approved by us.
Product: Wet/dry vacuum cleaner
Type: 1.573-xxx
Directives and Regulations2006/42/EC (+2009/127/EC)
2014/30/EU
2011/65/EU
Harmonised standards usedEN 55014-1: 2017 + A11: 2020
EN 55014-2: 2015
EN 60335-1
EN 60335-2-69
EN IEC 61000-3-2: 2019
EN 61000-6-3: 2007 + A1: 2001
EN 61000-6-2: 2005
EN 61000-3-11: 2000
EN 62233: 2008
EN IEC 63000: 2018
Name and addressDocumentation supervisor:
A. Haag
Kärcher Industrial Vacuuming GmbH
Robert-Bosch-Straße 4-8
73550 Waldstetten (Germany)
Tel.: +49 7171 94888-0
Fax: +49 7171 94888-528

Waldstetten, 2025/07/01
The signatories act on behalf of and with the authority of the Executive Board.
Kärcher Industrial Vacuuming GmbH
Robert-Bosch-Straße 4-8
73550 Waldstetten (Germany)
Ph.: +49 7171 94888-0
Fax: +49 7171 94888-528
Electrical connection | |
Mains voltage | 400 V |
Phase | 3 ~ |
Power frequency | 50 Hz |
Protection type | IPX4 |
Protection class | I |
Maximum permissible mains grid impedance | 0.400+j0.250 Ω |
Power | 4200 W |
Fuse protection | 16 A |
Characteristic of the fuse | B/C |
Device performance data | |
Tank content | 100 l |
Air quantity | 139 l/s |
Vacuum with pressure-limiting valve | 17,5 kPa |
Suction hose connection | DN70 |
Nominal width of the suction hose | DN40/50/70 |
Dimensions and weights | |
Typical operating weight | 142 kg |
Length x width x height | 1202 x 686 x 1465 mm |
Filter area | 2,2 m2 |
Effective filter area | 2,0 m2 |
Ambient conditions | |
Storage temperature | -10-40 °C |
Determined values in acc. with EN 60335-2-69 | |
Sound level LpA | 75 dB(A) |
Uncertainty KpA | 2 dB(A) |
Hand-arm vibration value | <2,5 m/s2 |
Uncertainty K | 0,2 m/s2 |
Mains cable | |
Power cord type | H07RN-F 5x2,5 mm2 |
Part number (EU) | 6.650-822.0 |
Cable length | 8,2 m |
Electrical connection | |
Mains voltage | 400 V |
Phase | 3 ~ |
Power frequency | 50 Hz |
Protection type | IPX4 |
Protection class | I |
Maximum permissible mains grid impedance | 0.400+j0.250 Ω |
Power | 4200 W |
Fuse protection | 16 A |
Characteristic of the fuse | B/C |
Device performance data | |
Tank content | -- l |
Air quantity | 139 l/s |
Vacuum with pressure-limiting valve | 17,5 kPa |
Suction hose connection | DN70 |
Nominal width of the suction hose | DN40/50/70 |
Dimensions and weights | |
Typical operating weight | 155 kg |
Length x width x height | 1202 x 686 x 1465 mm |
Filter area | 2,2 m2 |
Effective filter area | 2,0 m2 |
Ambient conditions | |
Storage temperature | -10-40 °C |
Determined values in acc. with EN 60335-2-69 | |
Sound level LpA | 75 dB(A) |
Uncertainty KpA | 2 dB(A) |
Hand-arm vibration value | <2,5 m/s2 |
Uncertainty K | 0,2 m/s2 |
Mains cable | |
Power cord type | H07RN-F 5x2,5 mm2 |
Part number (EU) | 6.650-822.0 |
Cable length | 8,2 m |
Electrical connection | |
Mains voltage | 400 V |
Phase | 3 ~ |
Power frequency | 50 Hz |
Protection type | IPX4 |
Protection class | I |
Maximum permissible mains grid impedance | 0.156+j0.098 Ω |
Power | 5500 W |
Fuse protection | 16 A |
Characteristic of the fuse | C |
Device performance data | |
Tank content | -- l |
Air quantity | 139 l/s |
Vacuum with pressure-limiting valve | 24,0 kPa |
Suction hose connection | DN70 |
Nominal width of the suction hose | DN40/50/70 |
Dimensions and weights | |
Typical operating weight | 158 kg |
Length x width x height | 1202 x 686 x 1465 mm |
Filter area | 2,2 m2 |
Effective filter area | 2,0 m2 |
Ambient conditions | |
Storage temperature | -10-40 °C |
Determined values in acc. with EN 60335-2-69 | |
Sound level LpA | 77 dB(A) |
Uncertainty KpA | 2 dB(A) |
Hand-arm vibration value | <2,5 m/s2 |
Uncertainty K | 0,2 m/s2 |
Mains cable | |
Power cord type | H07RN-F 5x2,5 mm2 |
Part number (EU) | 6.650-822.0 |
Cable length | 8,2 m |
Electrical connection | |
Mains voltage | 400 V |
Phase | 3 ~ |
Power frequency | 50 Hz |
Protection type | IPX4 |
Protection class | I |
Maximum permissible mains grid impedance | 0.400+j0.250 Ω |
Power | 7500 W |
Fuse protection | 32 A |
Characteristic of the fuse | B/C |
Device performance data | |
Tank content | -- l |
Air quantity | 156 l/s |
Vacuum with pressure-limiting valve | 29,0 kPa |
Suction hose connection | DN70 |
Nominal width of the suction hose | DN40/50/70 |
Dimensions and weights | |
Typical operating weight | 180 kg |
Length x width x height | 1202 x 686 x 1465 mm |
Filter area | 2,2 m2 |
Effective filter area | 2,0 m2 |
Ambient conditions | |
Storage temperature | -10-40 °C |
Determined values in acc. with EN 60335-2-69 | |
Sound level LpA | 73 dB(A) |
Uncertainty KpA | 2 dB(A) |
Hand-arm vibration value | <2,5 m/s2 |
Uncertainty K | 0,2 m/s2 |
Mains cable | |
Power cord type | H07RN-F 5x2,5 mm2 |
Part number (EU) | 6.650-823.0 |
Cable length | 8,2 m |
2-2-HC-A5-GS-awx2508