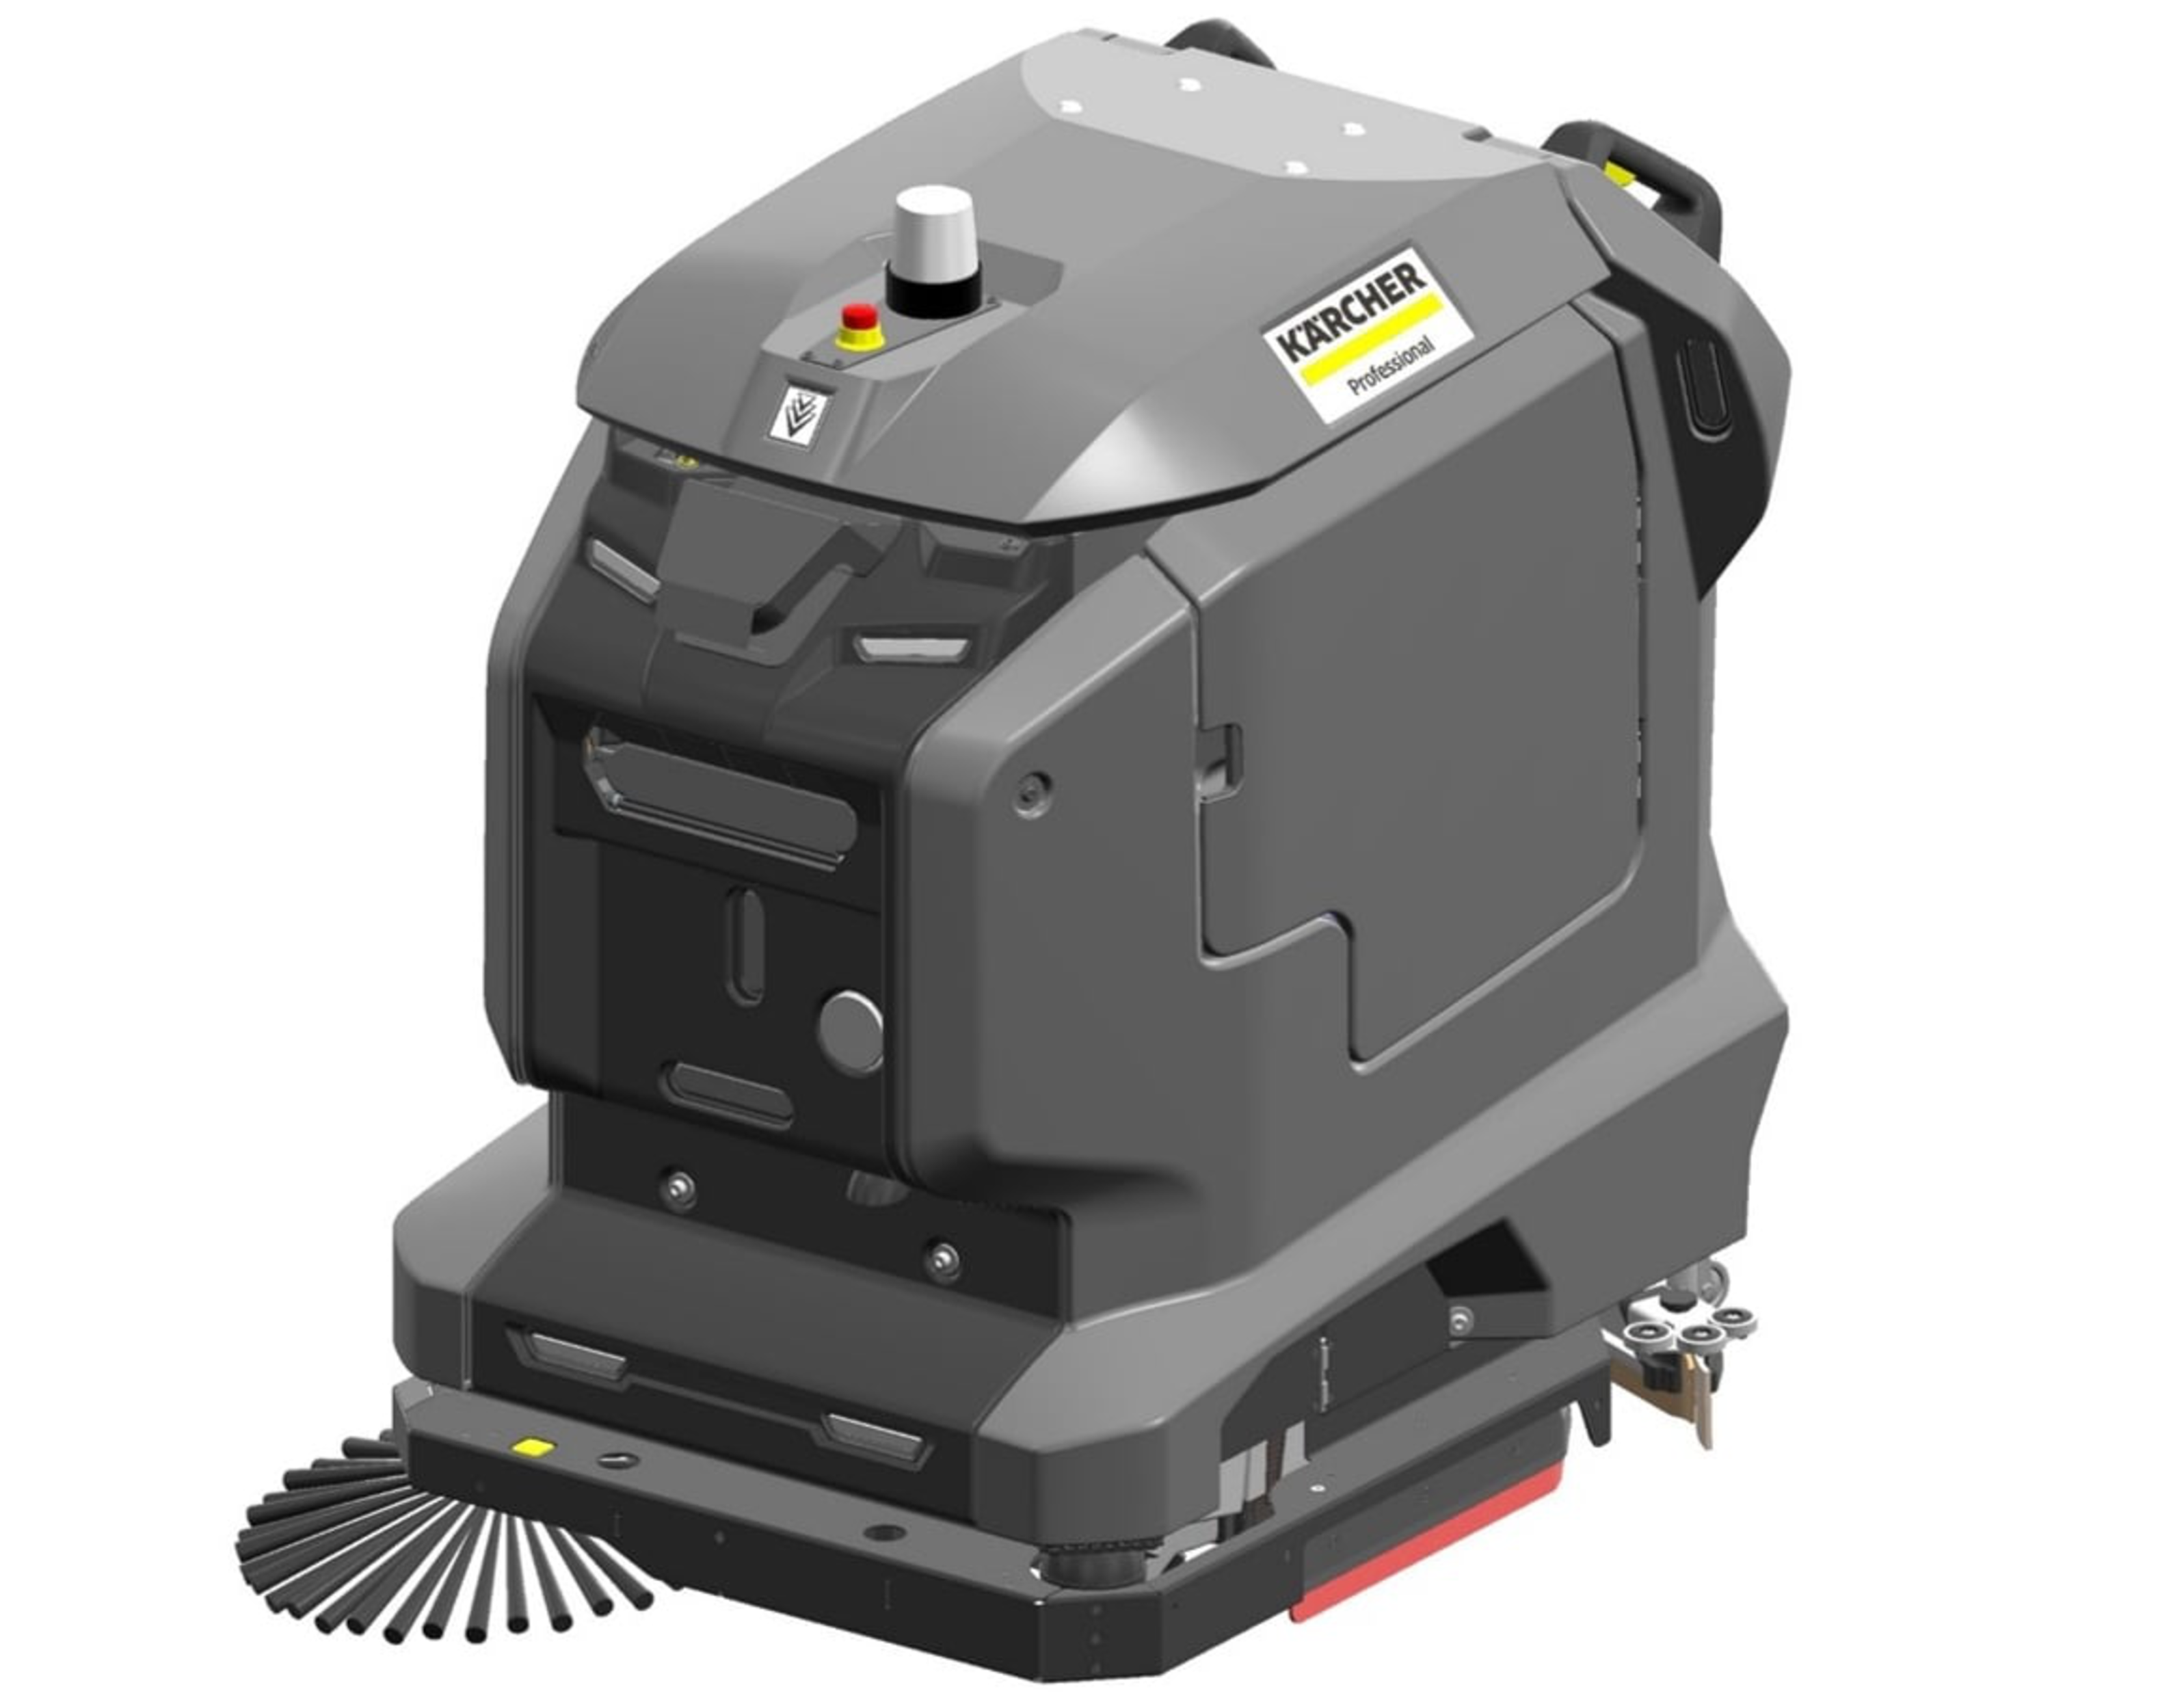
KIRA B 50
59800880 (03/26)
59800880 (03/26)
 Read theses original instructions before using the device for the first time and act in accordance with them.
Keep these operating instructions for future reference or for future owners.
These operating instructions are an excerpt from the operating instructions that must be enclosed with the device as a printed version due to the applicable regulations.
Before using the device for the first time, also read the complete operating instructions, which can be accessed on the device display or downloaded to a smartphone.
This device may contain components licensed under an open source licence and/or developed by third parties. A list of the open source software components present in the device (including copyright holders and licence conditions) can be displayed on the touch screen of the device. To view, open the main menu, go to Settings and open System Info.
These instructions are intended for the user groups Users and Administrator.
Each user can be granted or denied permissions for various device functions via the touch screen of the device.
All descriptions in this manual refer to the standard settings suggested in the device for the respective user group.
READ ALL INSTRUCTIONS BEFORE USING THIS APPLIANCE
To reduce the risk of fire, electric shock, or injury:
DO NOT LEAVE appliance unattended when plugged in. Unplugfrom outlet when not in use and before servicing.TO REDUCE THE RISK OF ELECTRIC SHOCK-USE INDOORS ONLY
DO NOT USE FOR CLEANING PURPOSES ON SURFACES HAVING A GRADIENT EXCEEDING THAT MARKED ON THE MACHINE
THE MACHINE SHALL BE PARKED SAFELY
Do not allow to be used as a toy. Close attention is necessary when used by or near children.
Use only as described in this manual. Use only manufacturer’s recommended attachments.
Do not use with damaged cord or plug. If the unit is not working as it should, has been dropped, damaged, left outdoors, or dropped into water, return it to a service center.
Do not pull or carry by the cord, do not use cord as a handle, do not close a door on the cord, or pull cord around sharp edges or corners. Do not run appliance over cord. Keep cord away from heated surfaces.
DO NOT UNPLUG BY PULLING CORD. To unplug, grasp plug, not cord.
Do not handle plug or appliance with wet hands.
Do not put any objects into openings. Do not use if openings are blocked; keep free of dust, lint, hair, and anything that may reduce air flow.
KEEP HAIR, CLOTHING, LOOSE JEWELRY, FINGERS and all parts of the body away from openings and moving parts.
Turn off all controls before unplugging.
Use extra care when cleaning on stairs.
Do not use to pick up flammable or combustible liquids, such as gasoline, or use in areas where they may be present.
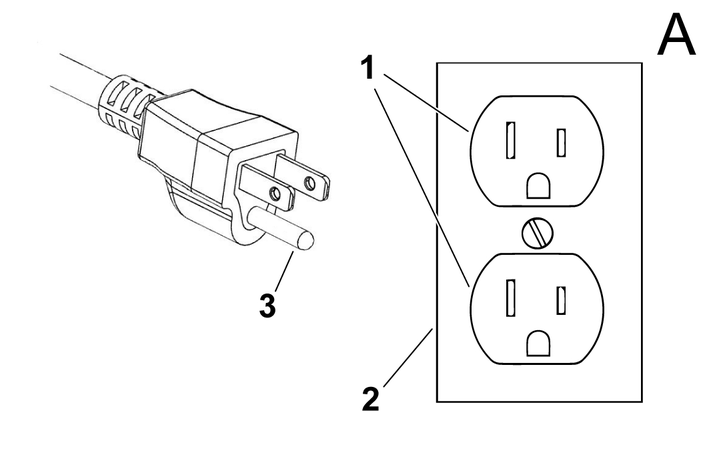
Connect to a properly grounded outlet only. See Grounding Instructions.
Always disconnect cord from electrical outlet before servicing appliance.
Never sweep off explosive liquids, combustible gases or undiluted acids and solvents. This includes petrol, paint thinner or heating oil which can generate explosive fumes or mixtures upon contact with the air. Acetone, undiluted acids and solvents must also be avoided as they can harm the materials on the machine.
Do not vacuum up burning or smouldering objects!
This device must be grounded. If it should malfunction or break down, grounding provides a path of least resistance for electric current to reduce the risk of electric shock.
This device is equipped with a cord having an equipment grounding conductor and ground plug.
The plug must be plugged into an appropriate outlet that is properly installed and grounded in accordance with all local codes and ordinances.
Improper connection of the equipment grounding conductor can result in a risk of electrocution.
Check with a qualified electrician or service personnel if you are in doubt as to whether the outlet is properly grounded.Do not modify the plug provided with the product - if it will not fit the outlet, have a proper outlet installed by a qualified electrician.Do not use any type of adapter with this product.This appliance is for use on a nominal 120-volt circuit and has a grounding attachment plug that looks like the plug illustrated in Figure A.Make sure that the appliance is connected to an outlet having the same configuration as the plug.No adaptor should be used with this appliance.CONNECT TO A PROPERLY GROUNDED OUTLET ONLY
The owner and/or user must have an understanding of the manufacturer’s operating instructions and warnings before using this device.
Warning information should be emphasized and understood.
If the operator is not fluent in English, the manufacturer’s instructions and warnings shall be read to and discussed with the operator in the operator’s native language by the purchaser/ owner, making sure that the operator comprehends its contents.
Owner and/or user must study and maintain for future reference the manufacturers’ instructions.
Before starting operation, the device must be in the operating position.
Do not start or operate the device, any of its functions or attachments, from any place other than from the designated operator's position.
Before leaving the operator’s position:
bring the device to a complete stop;
if the device must be on an incline, block the wheels.
Maintain a safe distance from the edge of ramps, platforms, and other similar working surfaces.
Do not add to, or modify the device.
Do not block access to fire aisles, stairways or fire equipment.
Yield the right of way to pedestrians and emergency vehicles such as ambulances and fire trucks.
Cross railroad tracks at an angle wherever possible. Do not park closer than 6 ft (1800 mm) to the nearest rail of a railroad track.
Keep a clear view of the path of travel and observe for other traffic, personnel, and safe clearances.
Under all travel conditions, operate the device at a speed that will permit it to be brought to a stop in a safe manner.
Do not indulge in stunt driving or horseplay.
Slow down for wet and slippery floors. Before driving over a dockboard or bridge plate, be sure that it is properly secured. Drive carefully and slowly across the dockboard or bridge plate, and never exceed its rated capacity.
When negotiating turns, reduce speed to a safe level consistent with the operating environment. Make the turns smoothly.
If the device is found to be in need of repair or in any way unsafe, or contributes to an unsafe condition, the matter shall be reported immediately to the user’s designated authority, and the device shall not be operated until it has been restored to safe operating condition.
If during operation the device becomes unsafe in any way, the matter shall be reported immediately to the user’s designated authority, and the device shall not be operated until it has been restored to safe operating condition.
Do not make repairs or adjustments unless specifically authorized to do so.
Operation of the device may be hazardous if maintenance is neglected or repairs, rebuilds, or adjustments are not performed in accordance with the manufacturer’s design criteria. Therefore, maintenance facilities (on or off premises), trained personnel, and detailed procedures shall be provided.
Maintenance and inspection of the device shall be performed in conformance with the following practices:
a scheduled planned maintenance, lubrication, and inspection system shall be followed; consult the manufacturer’s recommendations.
Only trained and authorized persons shall be permitted to operate a powered floor scrubber. Operators of powered floor scrubbers shall be qualified as to visual, auditory, physical, and mental ability to operate the equipment safely.
Avoid fire hazards and have fire protection equipment present in the work area. Do not use open pans of fuel or flammable cleaning fluids for cleaning parts.
Any device not in safe operating condition shall be removed from service.
Repairs shall not be made in Class I, Class II, and Class III locations.
Fire Prevention.The device shall be kept in a clean condition and reasonably free of lint, excess oil, and grease.
Noncombustible agents are preferred for cleaning the device. Flammable liquids [those having flash points at or above 100°F (37,8°C)] are not allowed. Precautions regarding toxicity, ventilation, and fire hazard shall be appropriate for the agent or solvent used.
Nameplate Visibility. The device type designations as shown on the nameplate and the type markers shall not be covered over with paint so that their identification information is obscured.
Before using the device for the first time, read and observe these operating instructions and the complete operating instructions (in the device display).
Operate the device only when the hood and all covers are closed.
In an emergency, press the emergency stop button to stop movements immediately.
Only operate the device on surfaces that do not exceed the maximum permitted slope, see the technical data.
Do not place any part of your body between the docking station and the device during the docking process.
Indication of an imminent threat of danger that will lead to severe injuries or even death.
Indication of a potentially dangerous situation that may lead to severe injuries or even death.
Indication of a potentially dangerous situation that may lead to minor injuries.
Indication of a potentially dangerous situation that may lead to damage to property.
Wear suitable gloves when working with the device.
Risk of asphyxiation. Keep packaging film out of the reach of children.
Only use the device for its proper use. Take into account the local conditions and beware of third parties, in particular children, when working with the device.
The device is not intended for use by persons with restricted physical, sensory or mental abilities or those lacking in experience and / or lacking in knowledge.
Only people who have been instructed on how to use the device, or have proven their ability to operate it, and have been explicitly instructed to use it, must use the device.
Children must not operate the device.
Children must be supervised to prevent them from playing with the appliance.
Keep children and unauthorised persons away from the device.
Safety devices are provided for your own protection. Never modify or bypass safety devices.
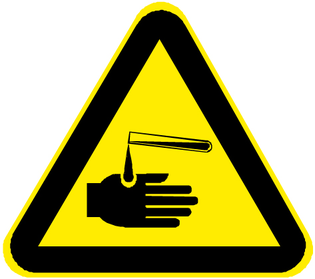
Risk of injury from petrol cap!
Risk of crushing limbs due to unexpected closing of the petrol cap.
Open the petrol cap as far as it will go to avoid accidental closing.Close the petrol cap only when there are no limbs between the tank and the petrol cap.The voltage indicated on the type plate must match the voltage of the power source.
Never touch the mains plug and socket with wet hands.
Only connect protection class I devices to properly earthed power sources.
For safety reasons we recommend operating the device only via a fault current protection switch (maximum 30 mA).
Switch off the device immediately in the event of leaks.
In the case of any foam formation or escaping liquids, switch off the device immediately and remove the mains plug from the docking station or the charger.
Check that the mains connection cable with mains plug is undamaged each time before using the device. To avoid any possible danger, a damaged mains connection cable must be immediately replaced by the manufacturer, or the authorised customer service department or a qualified electrician.
Do not damage the power supply and extension cable by running over it, crushing or yanking it or similar. Protect the power supply cable from heat, oil and sharp edges.
Only use the mains connection cable prescribed by the manufacturer, including when replacing the cable. For order no. and type see operating instructions.
Do not allow the mains connection to come into contact with rotating brushes.
Only replace couplings on the power supply or extension cable with those with the same splash guard and the same mechanical strength.
Before startup, check the device as described in the chapter "Checking the device".
Observe the rules for autonomous operation as described in the chapter "Rules for autonomous operation".
When using the device in hazard zones (e.g. service stations), adhere to the respective safety regulations.
Operation in explosive atmospheres is prohibited.
Never spray or vacuum fluids, flammable gases, explosive dusts as well as undiluted acids and solvents. These include petrol, paint thinners or heating oil, which can form explosive vapours or mixtures through suction air turbulence, also acetone, undiluted acids and solvents because these attack the materials used in the machine.
Never use the device to extract any burning or smouldering objects.
Never use the device to vacuum up people or animals.
Do not use the device on slippery floors.
On inclined surfaces, do not exceed the value for the angle of inclination to the side and in the travel direction in the operating instructions.
Wear tight-fitting clothing to avoid being caught by rotating parts (no tie, no long, wide skirt, etc.).
Users must be adequately instructed in the use of the device.
Check the device and the accessories each time before operation, in particular the mains connection and extension cable, to make sure it is safe and working correctly. Pull out the mains plug in case of any damage and do not use the device.
Do not transport passengers with the device.
Never open the cover while the motor is running.
The device is not suitable for sucking dust that is harmful to health.
Do not operate the device at temperatures below 0 °C.
The device is not a vacuum cleaner. Do not extract more liquid than you sprayed. Never use the device for extracting dry dirt.
The device is only suitable for use on the coats listed in the operating instructions.
The device is suitable for damp to wet soil up to 1 cm water height. Do not drive into areas where the water height is more than 1 cm.
Observe the legal regulations when disposing of waste water and brine.
Do not use the device outdoors.
Keep the detergent out of the reach of children.
Never use the recommended detergents undiluted. These products are operationally safe since they do not contain any acids, alkali or substances that are harmful to the environment. Should detergents come into contact with eyes, rinse these out immediately and thoroughly using water and seek medical attention immediately. The same applies if detergents are swallowed.
Only use the detergents recommended by the manufacturer and observe the application, disposal and warning instructions of the detergent manufacturers.
Lithium-ion batteries are built into this device. These are subject to special criteria. Removal and installation as well as testing of defective batteries may only be carried out by Kärcher customer service or a qualified specialist.
For storage and transport instructions, please contact your Kärcher Customer Service.
Modifications and alterations to the device are not permitted.
You must not open the battery, there is a danger of a short circuit. Irritating vapours or corrosive liquids can also escape.
Do not expose the battery to strong sunlight, heat or fire. There is a danger of explosion.
Do not operate the charger in an explosion-hazard environment.
Do not use a dirty or wet charger.
Ensure sufficient ventilation during the charging process.
Danger of explosion. Keep naked flames away from the battery or the battery charging room, and do not generate sparks or smoke in the vicinity of a battery of a battery charging room.
Danger of explosion. Do not place any tools or objects on the battery, i.e. on the end poles and cell connectors.
Check the device and the mains cable for damage before each use. Do not use damaged devices and have damaged parts repaired by qualified personnel only.
Keep children away from batteries and charger.
Do not charge damaged batteries. Have damaged batteries replaced by Kärcher customer service.
Do not throw a defective battery in the household rubbish. Inform Kärcher Customer Service.
Avoid contact with fluid leaking from defective batteries. In case of accidental contact, rinse the liquid with water. In case of contact with the eyes, consult a doctor as well.
Be sure to observe these operating instructions. Adhere to the recommendations of the legislature regarding the handling of batteries.
The mains voltage must match the voltage indicated on the type plate of the device.
Operate the battery only with this device. It is forbidden and dangerous to use it for other purposes.
Unsuitable brushes endanger your safety. Only use the brushes supplied with the device or brushes recommended in the operating instructions.
Before cleaning, maintenance, replacing parts or changing functions, you must ensure that the device is not being charged. To do this, disconnect the device from the docking station or remove the charging cable.
Before cleaning, maintenance, replacing parts or changing functions, the device must be brought to a safe shutdown by pressing the emergency stop button. All dangerous mechanical functions are only deactivated once in a safe shutdown. The display remains active to show the maintenance instructions to ensure that the work is carried out safely and correctly.
Have repair work, installation of spare parts and work on electrical components carried out by the authorised customer service only.
Repairs may only be carried out by approved customer service sites or staff qualified in this area who are familiar with all relevant safety instructions.
For wet application, the water level limiting device in the waste water tank must be cleaned regularly and checked for damage.
Pay attention to the safety inspection for mobile devices for industrial use in accordance with the locally applicable regulations
Short-circuits or other damage. Do not clean the device with a hose or high-pressure water jet.
Only use accessories and spare parts which are approved by the manufacturer. Only original accessories and original spare parts ensure that the appliance will run fault-free and safely.
Shut the motor down prior to transportation. Secure the device, taking into account its weight. See chapter Technical data in the operating instructions.
Missing or modified safety devices
Safety devices are provided for your own protection.
Never modify or bypass safety devices.The safety functions of the device are not affected in the absence of a network connection.
If the emergency stop button is pressed, all cleaning and driving functions are stopped immediately.
The device stops if both safety switches are released during manual operation.
In autonomous operation, actuation of a safety switch triggers an operating pause of 10 seconds.
The distance sensors detect obstacles and cause the device to circumnavigate the obstacles. The distance sensors comply with laser protection class 1 according to IEC 60825-1:2014.
The optical sensors detect obstacles and cause the device to circumnavigate the obstacles. The optical sensors comply with laser protection class 1 according to IEC 60825-1:2014.
This device is suitable for commercial and industrial use, e.g. in hotels, schools, hospitals, factories, shops, offices, and rental companies.
Users must be adequately instructed in the use of the docking station.
Use the docking station in dry areas only.
Unplug the docking station mains plug from the mains socket before carrying out any maintenance work.
Prevent the mains cable of the docking station from coming into contact with the rotating brushes of the floor cleaner.
Use the docking station indoors only
Store the docking station indoors only.
Observe the following warnings when handling the batteries:
 | Observe notes in the instructions for the battery, on the battery and in these operating instructions. |
 | Wear eye protection. |
 | Keep acids and batteries away from children. |
 | Risk of explosion |
 | Fire, sparks, open flames and smoking are prohibited. |
 | Risk of acid burns |
 | First aid. |
 | Warning |
 | Disposal |
 | Do not throw batteries in the bin. |
This device is suitable for commercial and industrial use, e.g. in hotels, schools, hospitals, factories, shops, offices, and rental companies. Use the device only in accordance with the information in these operating instructions.
The device may only be used for cleaning smooth surfaces that are insensitive to water and polishing.
The device is designed for indoor use.
This device is only suitable for use in dry areas.
The operational temperature range is between +5 °C and +40 °C.
The device is not suitable for cleaning frozen floors (e.g. in cold stores).
The device is suitable for a maximum water height of 1 cm. Do not drive into an area if there is a danger of exceeding the maximum water height.
When using chargers or batteries, only the components approved in the operating instructions may be used. A different combination must be confirmed by the responsible charger and/or battery supplier.
The device is not intended for cleaning public traffic routes.
The device must not be used on pressure-sensitive floors. Take into account the permissible load per unit area of the floor. The load per unit area caused by the device is specified in the technical data.
The device is not suitable for use in potentially explosive environments.
The device is approved for operation on surfaces with a maximum slope (see chapter "Technical Data").
The packing materials can be recycled. Please dispose of packaging in accordance with the environmental regulations.
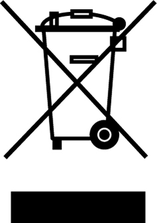
Electrical and electronic devices contain valuable, recyclable materials and often components such as batteries, rechargeable batteries or oil, which - if handled or disposed of incorrectly - can pose a potential danger to human health and the environment. However, these components are required for the correct operation of the device. Devices marked by this symbol are not allowed to be disposed of together with the household rubbish.
Current information on content materials can be found at: www.kaercher.de/REACH
Only use original accessories and original spare parts. They ensure that the appliance will run fault-free and safely.
Information on accessories and spare parts can be found at www.kaercher.com.
Check the contents for completeness when unpacking. If any accessories are missing or in the event of any shipping damage, please notify your dealer.
The warranty conditions issued by our sales company responsible apply in all countries. We shall remedy possible malfunctions on your device within the warranty period free of cost, provided that a material or manufacturing defect is the cause. In a warranty case, please contact your dealer (with the purchase receipt) or the next authorised customer service site.
(See overleaf for the address)

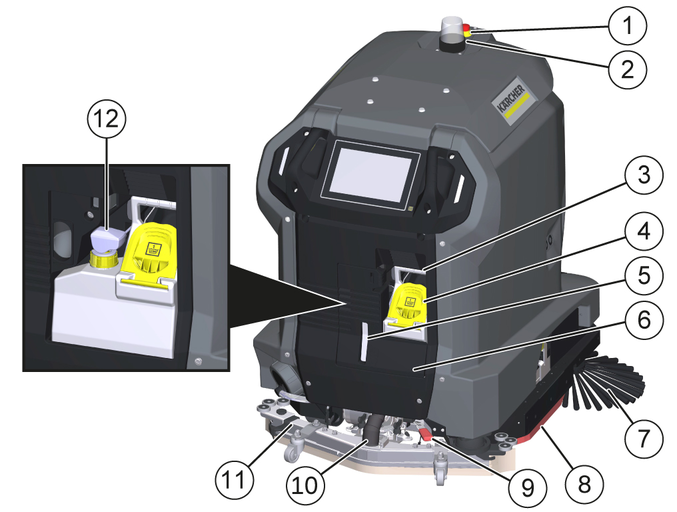
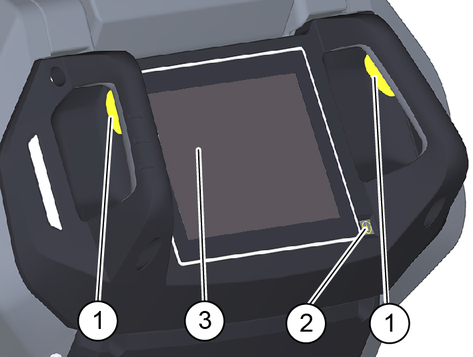
Control elements for the cleaning process are yellow.
Control elements for maintenance and servicing are light grey.
 | Detergent tank filling level 100% |
 | Detergent tank filling level 50% |
 | Detergent tank filling level 25% |
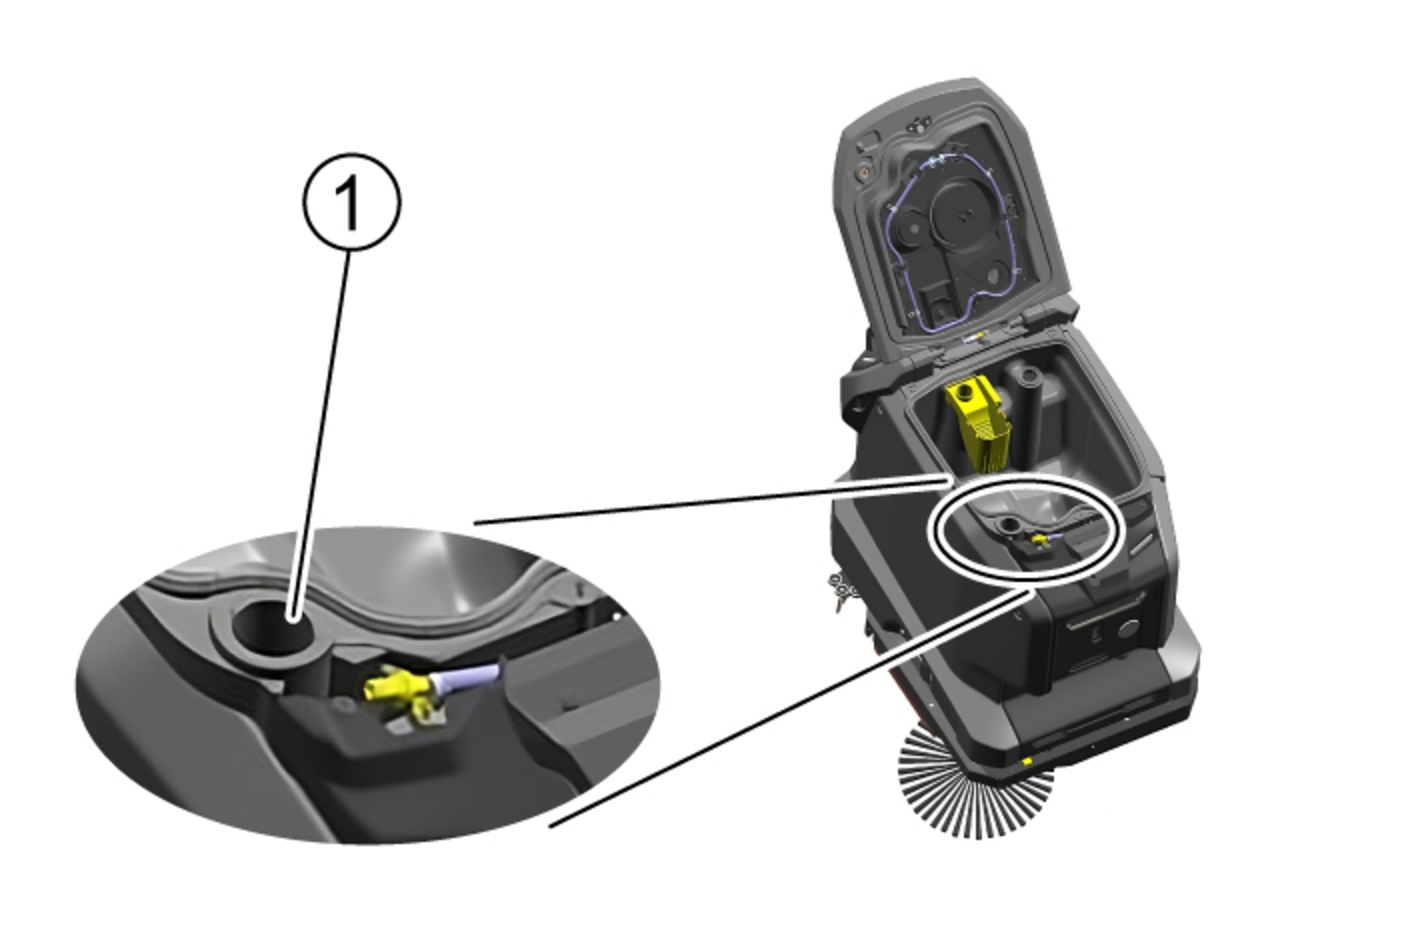
 | Detergent filling opening |
 | Unlocking button for brush replacement |
 | First lift the coarse dirt basket, then pull it out (for BR variant) |
 | Waste water drain hose |
 | Water inlet |
 | Drain for fresh water |
 | Mains plug for charging the battery |
 | Lashing point for transport |
 | Fresh water inlet |
Remove the cardboard box together with the wooden reinforcing timbers from the wooden base.
Remove the strap.
Unscrew the 4 wooden blocks on the left and right of the wooden base.
Unscrew and remove the 2 beams from the wooden base.
Unscrew the 3 boards from the wooden base.
Release the wing nuts.
Release the suction hose from the suction bar.
Pull off the suction bar to the rear.
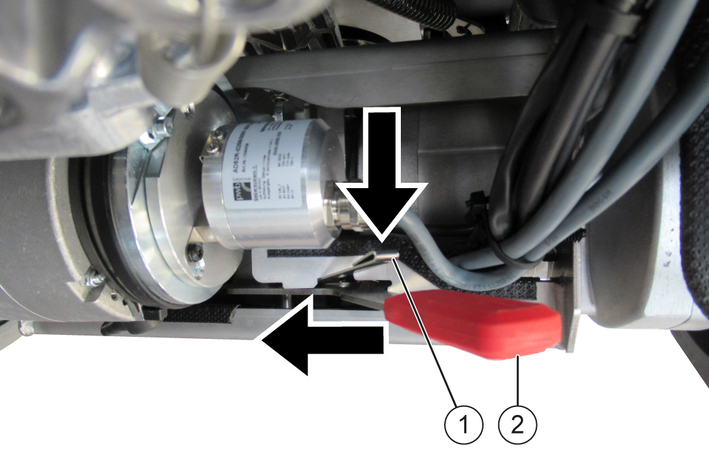
Press down the adjustment lock and move the release lever fully to the left.
Use the boards and the beams to lay a ramp behind the wooden base.
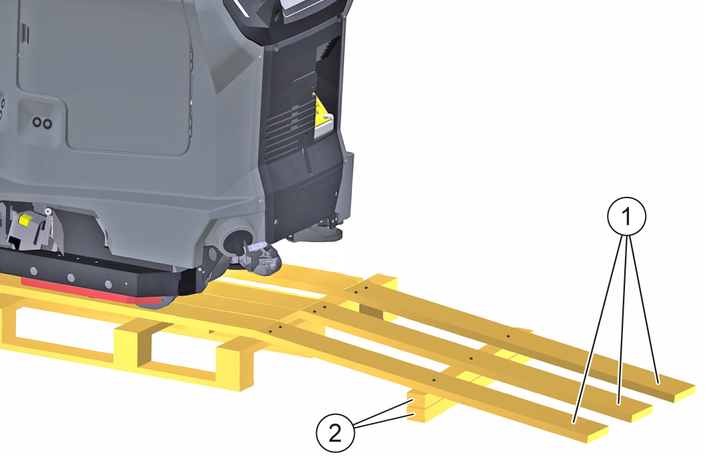
Fix the boards and the beams with the previously removed screws.
Pull the device backwards down the ramp from the wooden base.
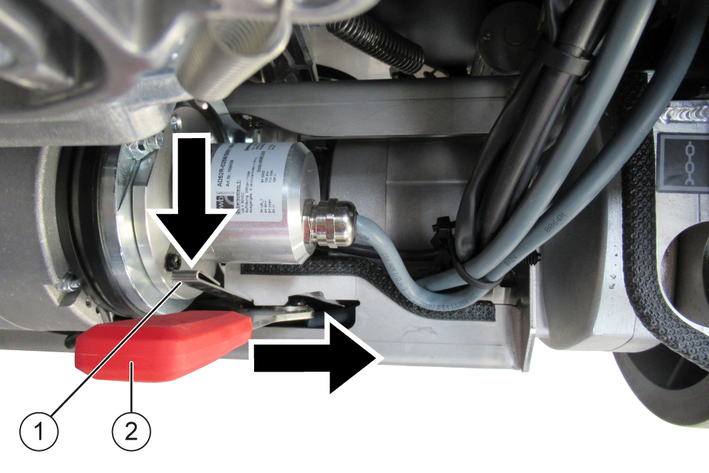
Press down the adjustment lock and move the release lever fully to the right.
The battery is automatically charged when operating with a docking station.
Without docking station:
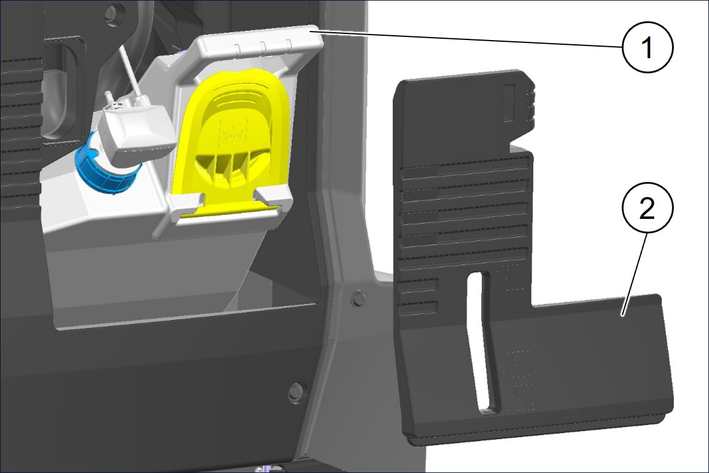
Open the door of the device compartment.
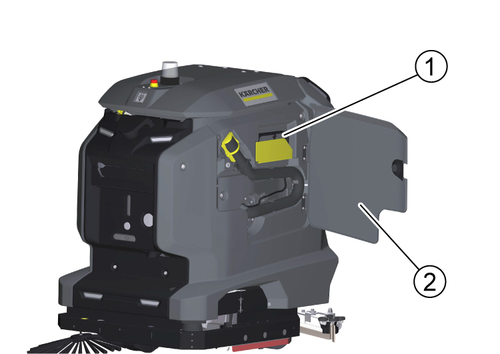
Pull out the charging cable.
If the device does not have a charging cable, plug a mains cable with an IEC plug into the mains socket on the docking port.
Plug the mains plug of the charging cable into a mains socket.
The charging process begins automatically.
The charging state is displayed on the touch screen.
The device cannot be used during the charging process.
The charging process takes about 8 hours when the battery is fully discharged.
Unplug the mains plug from the socket after the charging process has finished.
Stow the mains cable in the device compartment or unplug the power cable from the docking port.
If it is no longer possible to restart the system properly, the RESET button can be used to completely disconnect the system from the power supply and restart it.
Remove the cover.
Remove the detergent tank.
Press and hold the RESET button for approx. 10 seconds.

The system is now completely disconnected from the power supply.
Press the Power-On button to start up the device.
The system now boots up.
Insert the detergent tank again.
Attach the cover again.
After startup, the operating instructions of the device can be displayed on the touch screen. If the operating instructions are also downloaded to a smartphone, the operating steps can be read in parallel with the operation.
Scan the following code on the smartphone and follow the instructions to download the operating instructions.

The fresh water tank is automatically charged when operating with a docking station.
Risk of injury from petrol cap!
Risk of crushing limbs due to unexpected closing of the petrol cap.
Open the petrol cap as far as it will go to avoid accidental closing.Close the petrol cap only when there are no limbs between the tank and the petrol cap.Pivot the waste water tank lid upwards.
Connect the water supply hose to the hose coupling on the device. Observe the maximum water temperature of 50 °C!
Close the waste water tank cover.
Open the water inlet.
Filling stops automatically when the fresh water tank is full.
Risk of injury from petrol cap!
Risk of crushing limbs due to unexpected closing of the petrol cap.
Open the petrol cap as far as it will go to avoid accidental closing.Close the petrol cap only when there are no limbs between the tank and the petrol cap.Pivot the waste water tank lid upwards.
Insert the water supply hose into the filling opening. Observe the maximum water temperature of 50 °C!
Open the water inlet.
Observe the filling level and turn off the water supply when the tank is full.
Risk of damage
Use only recommended detergents. With other detergents, you are liable for the increased risk in terms of operational safety, risk of accident and reduced service life of the device. Use only detergents free of solvents, salt and hydrofluoric acid. Adhere to the safety instructions stated on the detergent packaging.Do not use strong foaming detergents.
Observe dosing instructions.
Recommended detergents:
Application | Detergent |
|---|---|
Maintenance cleaning of all water-resistant floors | APPROX 50 C RM 756 |
Maintenance cleaning with care components | RM 746 RM 780 |
Maintenance cleaning and basic cleaning of industrial floors | RM 69 |
Maintenance cleaning of glossy coverings | RM 755 |
Maintenance cleaning and basic cleaning of fine stone tiles | RM 753 |
Maintenance cleaning and basic cleaning of acid-resistant coverings | RM 751 |
Cleaning and disinfection | RM 732 |
Basic cleaning of all alkali-resistant floor coverings | RM 752 |
Basic cleaning and de-coating of alkali-sensitive floors | RM 754 |
Open the lid of the detergent filling opening.

Fill with detergent.
Note:
For quick detergent change, the detergent tank can be removed and exchanged with another detergent tank.
Remove the detergent tank lid.
Unscrew the detergent tank cap and remove the detergent using the filling level sensor.
Pull the detergent suction hose with filter out of the detergent tank.
Remove the detergent tank from the device.
Fit the new detergent tank into the device.
Insert the detergent suction hose with filter into the detergent tank.
Fit the detergent filling level sensor into the detergent tank.
Screw on the cap.
Replace the detergent tank lid.
Push the suction bar in the suction bar mount.
Tighten the wing screws.
Fit the suction hose onto the hose union.
The inclination of the suction bar is set at the factory. It only needs to be readjusted if the air bubble in the level indicator is not between the two marks when the suction bar is lowered on level ground.
Unscrew the nut.
Adjust the twist grip so that the air bubble of the spirit level is between the two lines when the suction bar is lowered.
Tighten the nut again.
The height adjustment affects the bending of the suction lips on contact with the floor.
Standard setting: 3 washers above, 3 washers below the suction bar.
Uneven floor: 5 washers above, 1 washer below the suction bar.
Very smooth floor: 1 washer above, 5 washers below the suction bar.
Unscrew the screw.
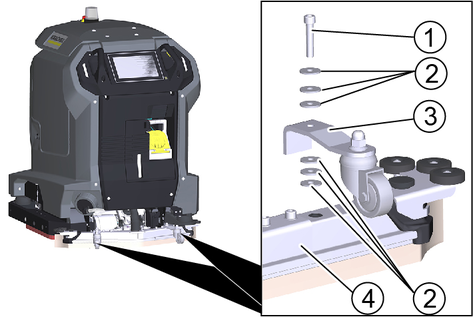
Thread the desired number of washers onto the screw above the suction bar.
Insert the screw through the spacer roller holder.
Thread the remaining washers onto the screw below the spacer roller.
Screw the screw into the suction bar and tighten.
Repeat the entire procedure at the second spacer roller.
Set both spacer rollers to the same height.
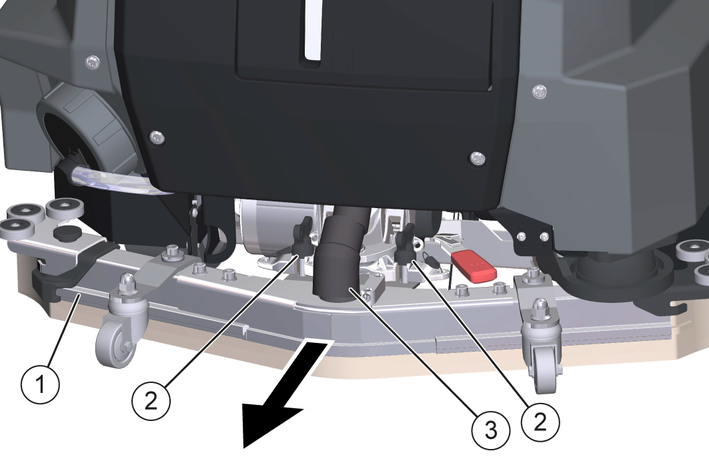
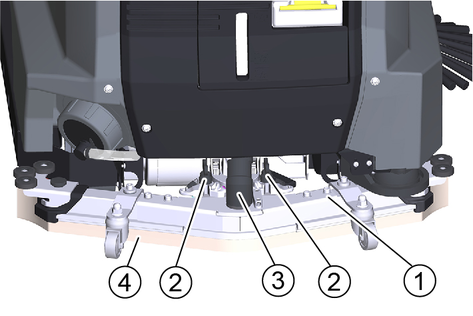
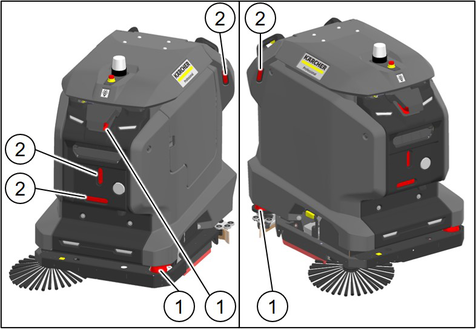
Device must be switched off.
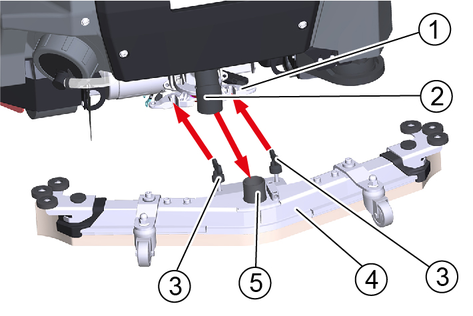
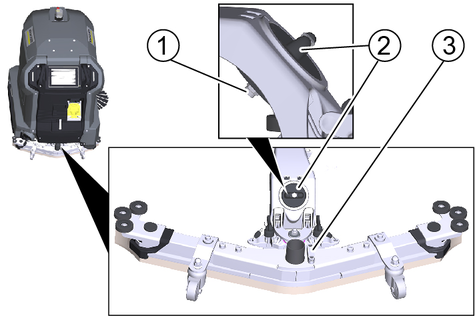
The brake release lever is located at the bottom right, behind the suction bar.
Press down the adjustment lock and move the release lever fully to the left.
Move the device.
After moving, swivel the brake release lever back to the right to its original position and allow it to engage.
Danger of accident
A damaged or defective device can lead to accidents during operation.
Check the device before use and report any damage or malfunctions to the person responsible.Do not use the device if it is damaged or malfunctions.Check the device for leaks.
Check the function of the emergency stop button.
Check both safety switches for function (does the device brake when both safety switches are released in manual operation?).
Danger of accident due to defective safety switches
Shut the device down immediately if one or both safety switches do not reliably return to the non-actuated position.Check the sensors for soiling, clean if necessary.
Restart the device.
Check the function of the sensors (does the device detect obstacles?).
Unlock the emergency stop button by pulling it.
Press the start button.
The device starts up.
Wait until the log-in screen is displayed on the touch screen.
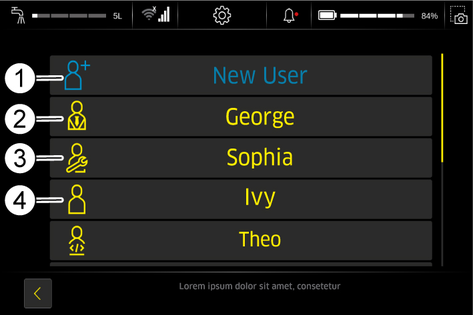
Administrator: Can use the full range of functions of the device and has all user permissions.
Service: Only available for Customer Service.
Users: Can use the range of functions defined by the permissions granted by Administrator.
Create a new user profile.
Assign a password.
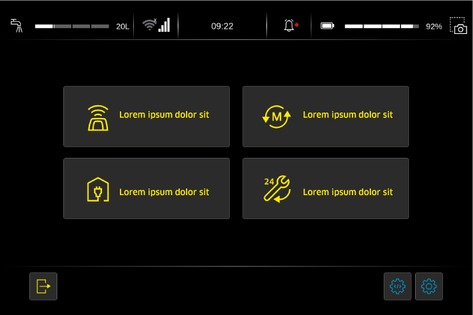
The executable functions are displayed in the main menu.
The operating instructions enclosed with the device only cover the activities for startup and a troubleshooting guide in case of a defective touch screen.
The complete operating instructions can be called up and displayed on the touch screen after the device has been started up.
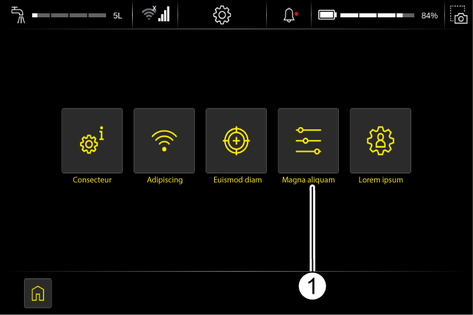
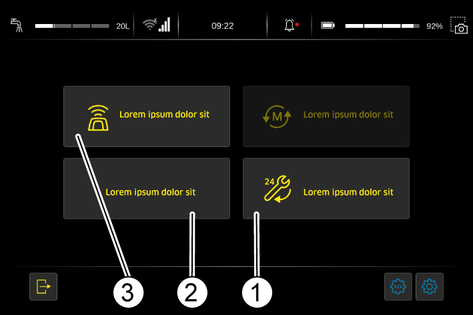
Press the "Service" button in the main menu.
Press the "Operating manual" button
The operating instructions are displayed on the touch screen.
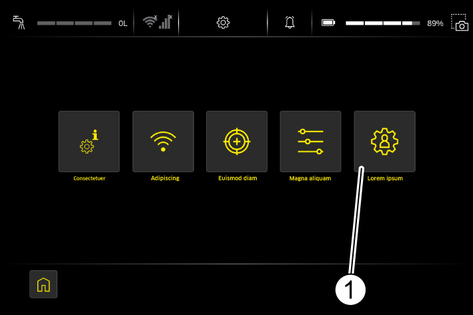
Press the Settings button in the main menu.
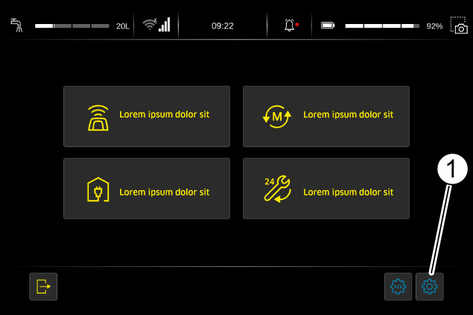
The Settings menu is displayed.
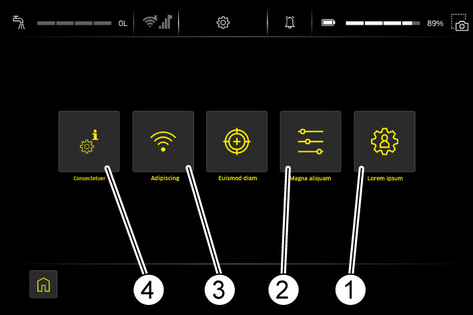
Press the "User administration" button in the Settings menu.
Press the "New user" button.
Select the desired language.
Touch the Username input field.
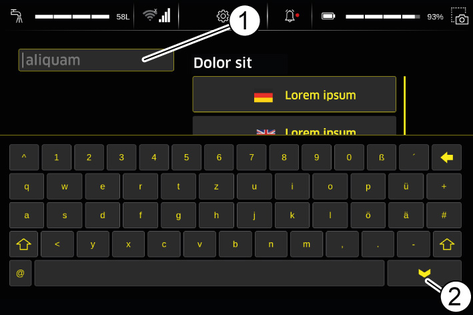
Enter the user name with the on-screen keyboard and finish with the Enter key.
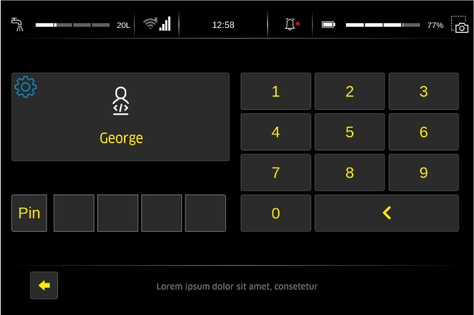
Press the "PIN" button.
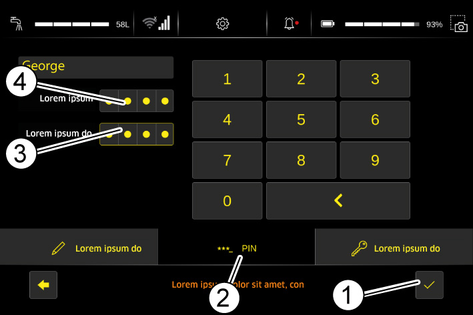
Touch the Enter Password input field.
Enter the password using the on-screen keyboard.
Re-enter the password for confirmation in the Confirm Password input field.
Press the Confirm button.
Press the "Authorisations" button
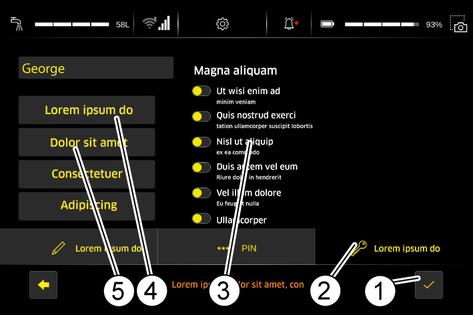
Press the button for the factory setting of the desired user group Users or Administrator.
If necessary, change individual permissions in the list.
Press the Confirm button.
Press the "Internet" button in the Settings menu.

The "Visible Networks" and the "Known Networks" are displayed.
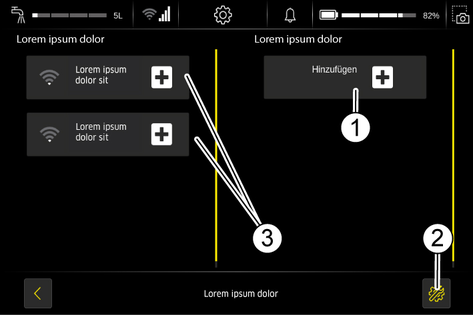
Press the "Settings" button.
The current network settings are displayed.

When activating "WLAN", the "Visible Networks" as well as the "Known Networks" are then displayed.
Press the "Internet" button in the Settings menu.
Press the "Add" button.
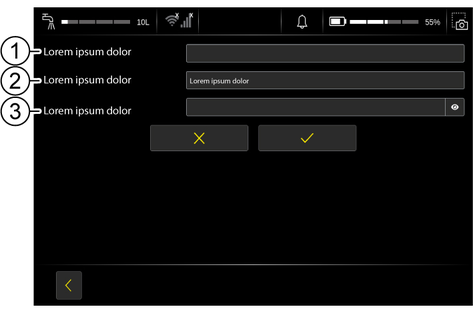
Enter the SSID of the wireless access point/router.
Select the encryption.
Enter the password.
Press the tick.
The network is added.
Press the "General Settings" button in the "Settings" menu.
Press the "General Settings" button.
The current general settings are displayed.
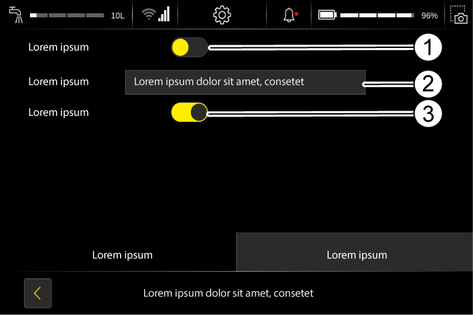
When "" is activated, the is activated.
The corresponding time zone can be set under "".
When "" is activated, the is activated.
Fastmode activated | |
Fastmode deactivated |
Docking involves connecting the device to an optional docking station. After successful docking, the following actions are performed:
The waste water tank is emptied and flushed.
The fresh water tank is filled.
The battery is charged.
Press the "Docking" button in the main menu.
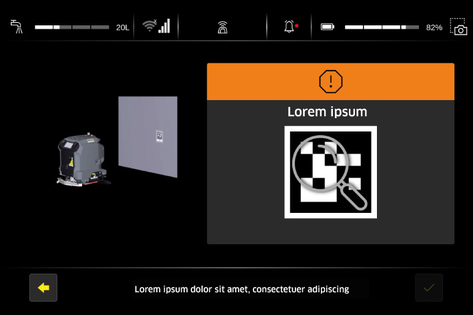
The device prepares for the docking procedure and searches for a Position code.
Operate a safety switch and push the device in front of the docking station.
Align the docking port with the docking station.
Keep a distance of about 2 m from the docking station.
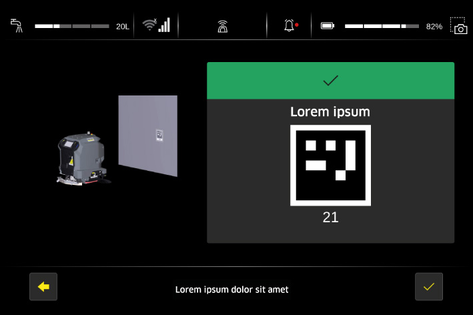
Wait until the device has detected the Position code on the docking station.
Confirm the Position code.
When the device is connected to the docking station, the following functions can be performed:
In manual operation, the device is guided by the operator over the surface to be cleaned.
Select the "Manual cleaning" function on the touch screen.
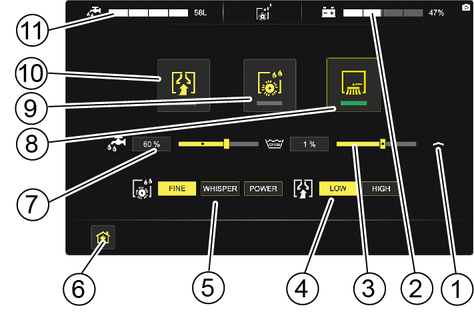
Operate and hold a safety switch.
Push the device to the operating location.
Let go of the safety switch.
Select the desired settings for water quantity, detergent dosage, brush power and suction power.
Activate the required functions (suction, cleaning head, side brush).
The activated functions are highlighted in green.
The side brush can only be activated when the cleaning head is switched on.
Operate and hold a safety switch.
Push the device over the surface to be cleaned.
Deactivate the cleaning head and the side brush.
Continue a short distance to suck out residual water.
Deactivate the suction.
The waste water tank is automatically charged when operating with a docking station.
Without docking station:
Dirt and detergents in the waste water can potentially harm your health or pollute the environment.
Observe the locally applicable regulations on the handling of waste water.Open the door of the device compartment.

Remove the drain hose from the support.
Lower the drain hose over a suitable collection device.
Press the dosing unit together or kink the hose.
Open the cover.
Control the flow of waste water by applying pressure or kinking the dosing device hose.
Rinse the waste water tank.
Close the cover.
Press the drain hose into the holder on the device.
Open the door of the equipment compartment.
Position the device over a water drain.
Unscrew the fresh water tank cap.
Allow the water to drain.
If necessary, remove and clean the sieve.
Install the sieve again.
Unscrew the fresh water tank cap.
Align the cap so that the hose connection is at the bottom.
Failure to observe the weight
Risk of injury and damage
Be aware of the weight of the device during transport and storage.Do not drive on slippery floors or ramps.Empty the waste water tank and the fresh water tank.
When transporting in vehicles, secure the device against slipping and tipping over according to the applicable guidelines.
Failure to observe the weight
Risk of injury and damage
Be aware of the weight of the device during transport and storage.Store the device indoors only.
Inadvertently starting up of the unit, touching live components
Risk of injury, electric shock
Before doing any work, disconnect the Device from the docking station or pull the Mains plug.Risk of damage
Do not spray the device with water. Do not use aggressive detergents.Note: Maintenance work marked with "##" is carried out automatically if a docking station is present.
## Drain the waste water.
## Rinse the waste water tank.
Clean the turbine screen.
Remove the coarse dirt filter from the waste water tank and clean it.
Clean the outside of the device with a cloth and mild washing lye.
Check the fluff filter and clean if necessary.
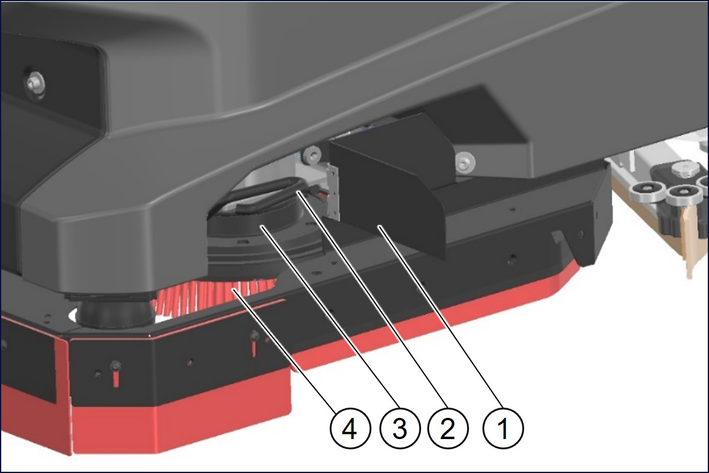
Remove the coarse dirt basket from the cleaning head and clean.
Clean the water distribution strip on the cleaning head.
Clean the suction lips in the suction bar and check for wear. Turn or replace the worn suction lips.
Check the correct fit of the suction lips in the suction bar. If necessary, reinsert the suction lips correctly into the grooves of the suction bar.
Clean the squeegee blades on both sides of the cleaning head and check for wear. Replace worn squeegee blades.
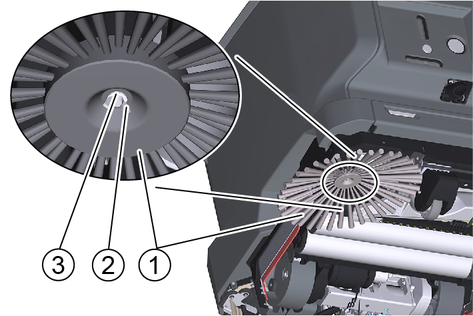
Check the brushes for wear and tear. Replace worn brushes.
Note: The roller brushes are worn out if the yellow indicator bristles are the same length as the other bristles.
## Charge the battery.
Clean the sensors with a moist microfibre cloth. If necessary, use additional glass cleaner.
## When used regularly, charge the batteries fully and without interruption at least once a week.
Clean the seals between the waste water tank and the cover.
Check the sealing between the waste water tank and the cover, replace the seal if necessary.
Clean the brush tunnel.
Clean the fresh water filter.
For long periods of disuse, only park and store the device when the batteries are fully charged. Fully charge the batteries at least once a month.
Have the prescribed inspection performed by Customer Service.
Various maintenance work is stored as animations in the device and can be called up on the touch screen.
Press the "Service" button in the main menu.
Press the "Maintenance instructions" button.
Touch the maintenance work you are looking for.
Call up the individual steps of the animation with the arrow keys.
Open the waste water tank cover.
Press the locking hooks together.
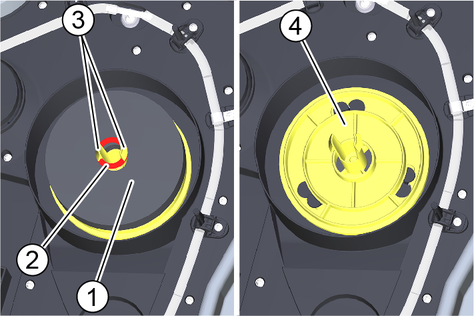
Pull off the retaining ring.
Pull off the float.
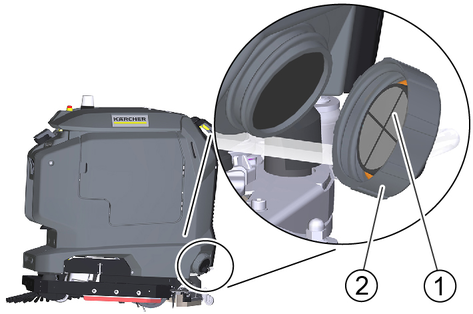
Turn the turbine screen anticlockwise.
Remove the turbine screen.
Clean the turbine screen under running water.
Reinstall the turbine screen.
Attach the float.
Push on the retaining ring and then pull it back to the locking hooks.
In the case of light soiling, it is sufficient to clean the turbine screen when it is installed.
Open the waste water tank cover.
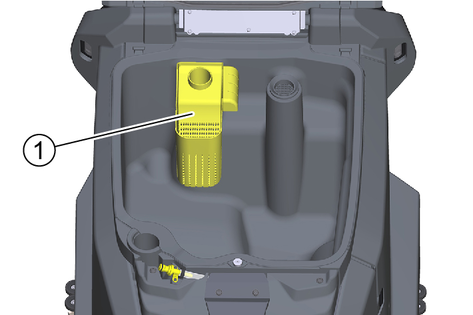
Pull the coarse dirt filter upwards and off.
Rinse off the coarse dirt filter under running water.
Reinsert the coarse dirt filter into the waste water tank.
Drain the fresh water (see chapter "Draining fresh water").
Unscrew the fresh water tank cap.
Pull out the fresh water filter and rinse with clean water.
Insert the fresh water filter.
Fit the fresh water tank lock.
Note: Take care to ensure that the hose connection in the fresh water tank cap is positioned at the lowest point in the tank after screwing the cap in place.
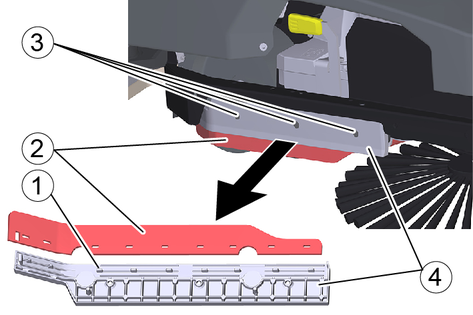
Loosen the two wing screws
Remove the suction bar from the device.
Pull the suction hose off the suction bar.
Rinse the underside of the suction bar with water.
Wipe the suction lips clean with a cloth.
Fit the suction bar on the device.
Tighten the two wing screws.
Connect the suction hose to the suction bar.
The suction lips are turned or replaced when they are worn down to the wear mark.
Remove the suction bar from the device.
Unscrew the star grips.
Remove the sleeves and the deflection rollers.
Pull off the end pieces.
Pull off the suction lips in the longitudinal direction.
Push new or turned suction lips into the suction bar.
Push on the end pieces.
Fit the deflection rollers and the sleeves.
Screw in and tighten the star grips.
Open the coarse dirt basket door.
Lift the coarse dirt basket and pull it out.
Empty the coarse dirt basket and clean it if necessary.
Replace the coarse dirt basket.
Empty the waste water tank. Leave the drain hose with the lid open over the water drain.
Open the "Service" menu on the touch screen.
Start the "Tank rinsing" function.
Risk of injury from petrol cap!
Risk of crushing limbs due to unexpected closing of the petrol cap.
Open the petrol cap as far as it will go to avoid accidental closing.Close the petrol cap only when there are no limbs between the tank and the petrol cap.Open the waste water tank cover.
Connect a water supply hose to the hose coupling on the device.
Close the cover of the waste water tank.
Open the water inlet.
Carry out the rinsing process for approx. 30 seconds.
Close the water inlet.
Exit the "Tank rinsing" function.
Unscrew the water supply hose from the device.
Close the waste water drain hose and press it into the support.
Open the door of the equipment compartment.
Empty the waste water tank. Leave the drain hose with the lid open over the water drain.
Risk of injury from petrol cap!
Risk of crushing limbs due to unexpected closing of the petrol cap.
Open the petrol cap as far as it will go to avoid accidental closing.Close the petrol cap only when there are no limbs between the tank and the petrol cap.Open the waste water tank cover.
Manually rinse the waste water tank using a water hose.
Close the waste water drain hose and press it into the support.
Open the door of the equipment compartment.
Open the coarse dirt basket door.
Lift the coarse dirt basket and pull it out.
Lift up the water distribution strip and pull it out.
Clean the water distribution strip.
Fit the water distribution strip again.
Insert the coarse dirt basket.
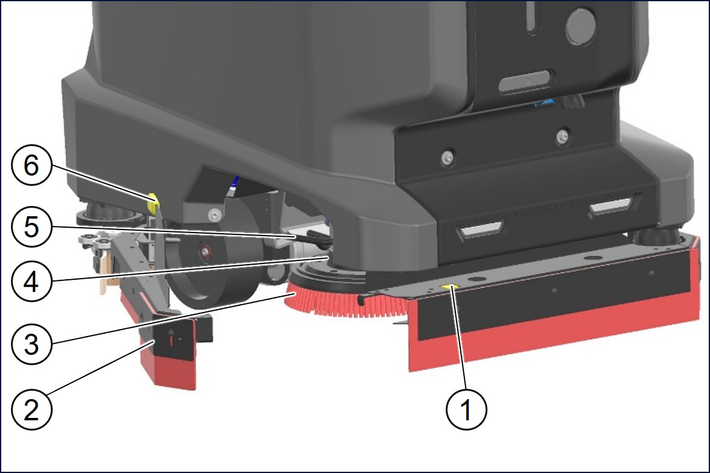
Press the push button and pivot the collision guard bar to the side.
Press the unlocking button.
Swing out the bearing cover.
Pull out the roller brushes.
Note: The roller brushes are worn out if the yellow indicator bristles are the same length as the other bristles.
Fit new roller brushes and centre them on the drivers by turning them back and forth.
Pivot back the bearing cover and latch the end caps of the roller brushes in the bearing cover.
Lift the squeegee blade then pivot back the collision guard and latch it in place.
Raise the cleaning heads (see chapter: "Service functions menu" in the enclosed software manual "KIRA B-Range Software" part number manual: 5.980-324.0).
Press the push button.
Lift the side skirt driver and swivel the collision guard to the side.
Press the unlocking lever down beyond the resistance.
Pull the right disc brush sideways and out from underneath the cleaning head.
Open the sweep bin flap.
Press the unlocking lever down beyond the resistance.
Pull the left disc brush sideways and out from underneath the cleaning head.
Note: The disc brushes are worn out if the indicator bristles are the same length as the other bristles.
Position the new disc brushes on the floor under the cleaning heads.
Lower the cleaning heads and engage (see chapter: "Service functions menu" in the enclosed software manual "KIRA B-Range Software" part number manual: 5.980-324.0).
Close the sweep bin flap.
Lift the side skirt driver and swivel the collision guard back and engage.
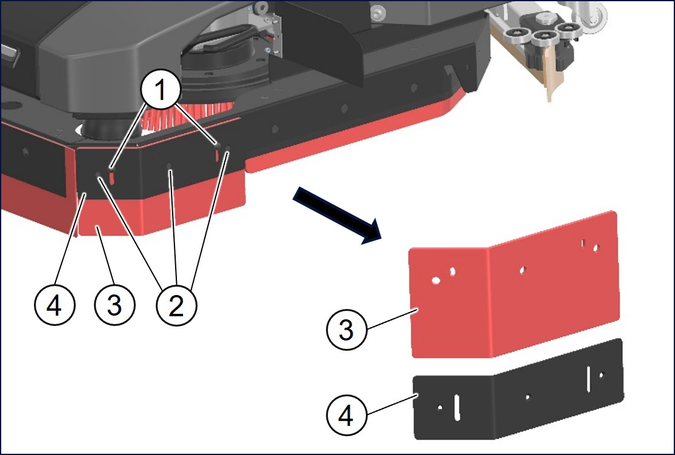
Unscrew the 3 screws.
Remove the squeegee blade together with the holder.
Remove the worn squeegee blade from the holder.
Thread the new squeegee blade onto the pins of the holder.
Reattach the holder together with the squeegee blade to the device.
Repeat the entire procedure at the other side.
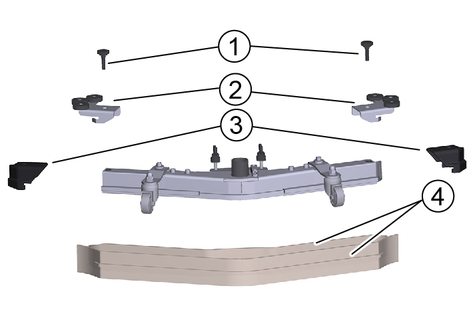
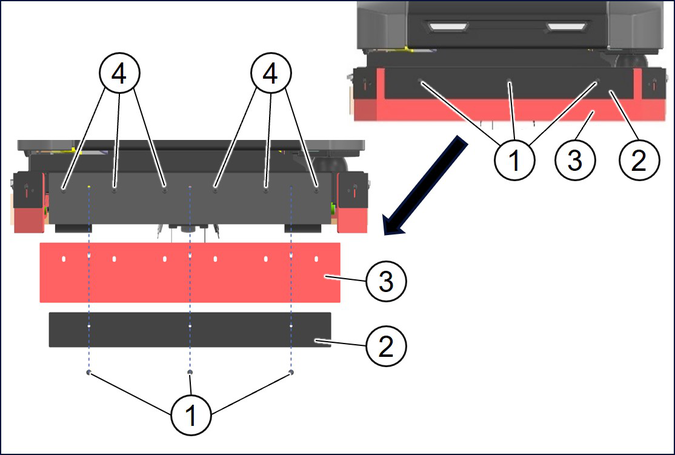
Unscrew the screws (2x).
Remove the squeegee blade together with the holder.
Unscrew the screws (3x).
Remove the worn squeegee blade from the holder.
Secure the new squeegee blade to the holder with the screws (3x).
Reattach the holder together with the squeegee blade to the device.
Repeat the entire procedure at the other side.
Unscrew the screws (3x).
Remove the holder.
Remove the worn squeegee blade.
Thread the new squeegee blade onto the pins.
Reattach the holder to the device.
Unscrew the wing screw.
Remove the side brush.
Fit the new side brush.
Screw in and tighten the wing screw and washer.
Danger from electric shock.
Before working on the docking station, unplug the Mains plug from the power outlet.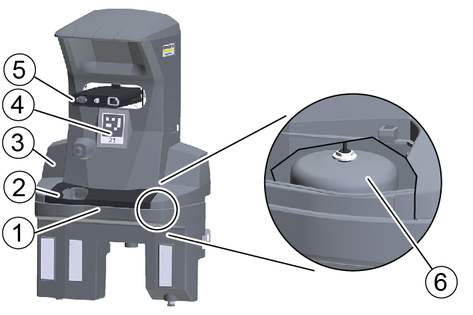
Remove the cover.
Check the float switch and float, clean if necessary.
Clean the waste water collection tray and rinse it with water.
Attach the cover.
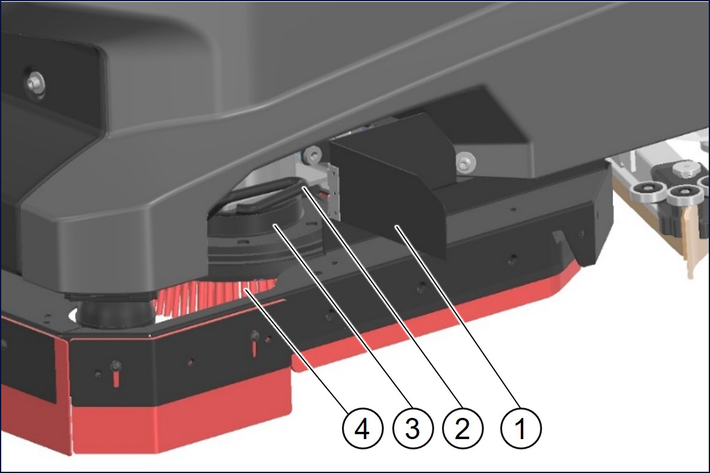
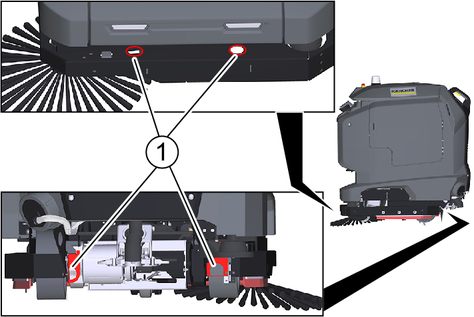
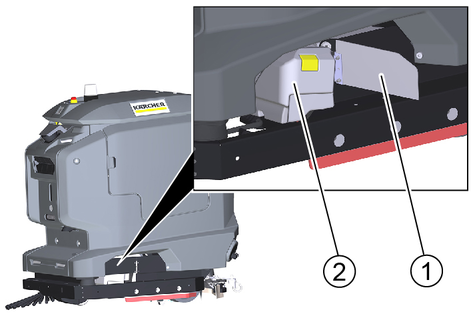
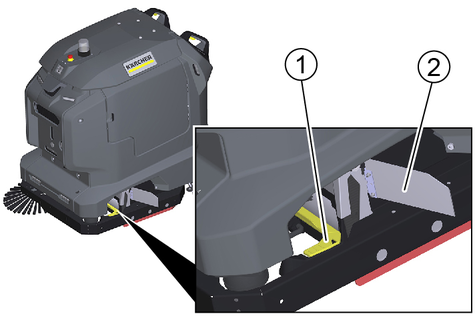
Den Position code clean with a damp cloth.
Check the male docking port for ease of movement.
For suitable use of the docking station, an open space in front of the docking station 2x2 m2 to provide for
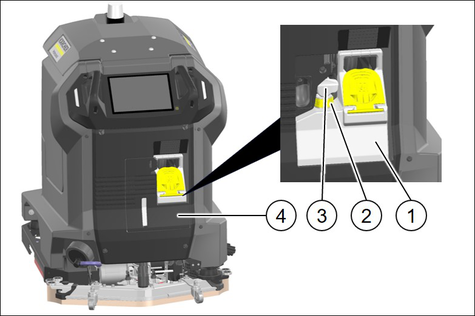
Clean all sensors shown in the illustration with a damp microfibre cloth. If necessary, use additional glass cleaner.
After cleaning, restart the device.
Internal error
Cause:
Remedy:
Internal error occurred. Restart robot. If error persists, call the Service.
Internal error
Cause:
Remedy:
Internal error occurred. Restart robot. If error persists, call the Service.
Emergency stop button activated
Cause:
Remedy:
Robot stopped driving and cleaning. Check robot and surrounding. Release emergency stop button if no hazard is present.
Emergency stop button activated
Cause:
Remedy:
Robot stopped driving and cleaning. Check robot and surrounding. Release emergency stop button if no hazard is present.
Emergency stop button released
Cause:
Remedy:
Emergency stop button released. Robot continues normal operation.
Emergency stop button released
Cause:
Remedy:
Emergency stop button released. Robot continues normal operation.
Open waste water tank lid or clogging
Cause:
Waste water outlet has been opened but the waste water level in the robot does not change. Possibly the tank lid is opened or the waste water outlet is clogged.
Remedy:
Close waste water tank lid. Check waste water outlet and waste water tank for damages and clogging.
Docking station without power supply
Cause:
On-board charger of the robot is not provided with power.
Remedy:
Check if docking station is connected to power socket correctly. Check if power cable of docking station is damaged. Check if there is voltage at the power socket. Check if power connector of the docking port is damaged.
Docking station without water supply
Cause:
Float switch in the tub of the docking station is activated.
Remedy:
Water in docking station tub is not draining. Check docking station for damages and clogging. Check if float switch in the tub of the docking station can move freely and is in good condition.
Docking station clogged
Cause:
Unable to dock in docking station.
Remedy:
Check robot, docking station and surrounding. Remove obstacles.
Docking station clogged
Cause:
Unable to dock in docking station.
Remedy:
Check robot, docking station and surrounding. Remove obstacles.
Docking failed
Cause:
The robot lost its localization.
Remedy:
Drive robot to a position code and start a cleaning task. If the error persists, re-teach the route.
Docking failed
Cause:
The robot lost its localization.
Remedy:
Drive robot to a position code and start a cleaning task. If the error persists, re-teach the route.
Localization problem
Cause:
Remedy:
An operator cancelled the running autonomous task.
Localization problem
Cause:
Remedy:
An operator cancelled the running autonomous task.
Autonomous task cancelled
Cause:
Teached Smart-Fill area can't be processed.
Remedy:
Teach the route again and avoid complex Smart-Fill shapes (e.g. avoid crossing paths during Smart-Fill).
Autonomous task cancelled
Cause:
Teached Smart-Fill area can't be processed.
Remedy:
Teach the route again and avoid complex Smart-Fill shapes (e.g. avoid crossing paths during Smart-Fill).
Smart-Fill failed
Cause:
Remedy:
Bring robot back on designated path.
Smart-Fill failed
Cause:
Remedy:
Bring robot back on designated path.
Robot left designated path
Cause:
Remedy:
Robot finished cleaning task successfully.
Robot left designated path
Cause:
Remedy:
Robot finished cleaning task successfully.
Cleaning task finished
Cause:
The robot stopped because its path is blocked.
Remedy:
Check the surrounding of the robot. Remove obstacles on the path.
Cleaning task finished
Cause:
The robot stopped because its path is blocked.
Remedy:
Check the surrounding of the robot. Remove obstacles on the path.
Blocked path
Cause:
The cliff laser scanner detected dirt and isn't working properly anymore.
Remedy:
Clean cliff laser scanner and check it for damages. If error persists after robot restart, call the Service.
Blocked path
Cause:
The cliff laser scanner detected dirt and isn't working properly anymore.
Remedy:
Clean cliff laser scanner and check it for damages. If error persists after robot restart, call the Service.
Cliff laser scanner dirty
Cause:
The rear laser scanner detected dirt and isn't working properly anymore.
Remedy:
Clean the rear laser scanner and check it for damages. If error persists after robot restart, call the Service.
Cliff laser scanner dirty
Cause:
The rear laser scanner detected dirt and isn't working properly anymore.
Remedy:
Clean the rear laser scanner and check it for damages. If error persists after robot restart, call the Service.
Rear laser scanner dirty
Cause:
The rear laser scanner detected dirt and isn't working properly anymore.
Remedy:
Clean the rear laser scanner and check it for damages. If error persists after robot restart, call the Service.
Rear laser scanner dirty
Cause:
The rear laser scanner detected dirt and isn't working properly anymore.
Remedy:
Clean the rear laser scanner and check it for damages. If error persists after robot restart, call the Service.
Front laser scanner dirty
Cause:
The front laser scanner detected dirt and isn't working properly anymore.
Remedy:
Clean the front laser scanner and check it for damages. If error persists after robot restart, call the Service.
Front laser scanner dirty
Cause:
The front laser scanner detected dirt and isn't working properly anymore.
Remedy:
Clean the front laser scanner and check it for damages. If error persists after robot restart, call the Service.
Software update failed
Cause:
Software update couldn't be installed correctly.
Remedy:
System was reset to previous software status.
Software update failed
Cause:
Software update couldn't be installed correctly.
Remedy:
System was reset to previous software status.
Software update successful
Cause:
Remedy:
Software update successfully installed.
Software update successful
Cause:
Remedy:
Software update successfully installed.
Software update started
Cause:
Software update is being installed.
Remedy:
Don't switch off robot.
Software update started
Cause:
Software update is being installed.
Remedy:
Don't switch off robot.
Software update available
Cause:
Software update was downloaded successfully and is ready for installation.
Remedy:
Start software update in settings menu.
Software update available
Cause:
Software update was downloaded successfully and is ready for installation.
Remedy:
Start software update in settings menu.
Battery fully charged
Cause:
Remedy:
Battery is fully charged and robot is ready for operation.
Battery fully charged
Cause:
Remedy:
Battery is fully charged and robot is ready for operation.
Empty battery
Cause:
Remedy:
Charge battery immediately.
Empty battery
Cause:
Remedy:
Charge battery immediately.
Low battery level
Cause:
Remedy:
Charge battery soon.
Low battery level
Cause:
Remedy:
Charge battery soon.
Brake test failed. Check manual brake release
Cause:
Motion was detected while the robot was testing the engaged brakes.
Remedy:
The brakes are most likely not engaged. Push the red lever between the wheels to the right to engage them.
Brake test failed. Check manual brake release
Cause:
Motion was detected while the robot was testing the engaged brakes.
Remedy:
The brakes are most likely not engaged. Push the red lever between the wheels to the right to engage them.
Brake test necessary. Keep handle switches activated
Cause:
Handle switches were activated and a brake test is necessary.
Remedy:
Keep handle switches activated until the brake test is finished, the brakes are released and the robot can be moved again.
Brake test necessary. Keep handle switches activated
Cause:
Handle switches were activated and a brake test is necessary.
Remedy:
Keep handle switches activated until the brake test is finished, the brakes are released and the robot can be moved again.
No motor support while logged out
Cause:
The cliff laser scanner detected a cliff and triggered a safety stop. Manual operation of the robot near cliffs is only permitted when the user is logged in.
Remedy:
Log in with user profile while operating robot near a cliff.
No motor support while logged out
Cause:
The cliff laser scanner detected a cliff and triggered a safety stop. Manual operation of the robot near cliffs is only permitted when the user is logged in.
Remedy:
Log in with user profile while operating robot near a cliff.
User is not logged in while cliff is detected
Cause:
The cliff laser scanner detected a cliff and triggered a safety stop. Manual operation of the robot near cliffs is only permitted when the user is logged in.
Remedy:
Log in with user profile while operating robot near a cliff.
User is not logged in while cliff is detected
Cause:
The cliff laser scanner detected a cliff and triggered a safety stop. Manual operation of the robot near cliffs is only permitted when the user is logged in.
Remedy:
Log in with user profile while operating robot near a cliff.
Cleaning modules check
Cause:
Cleaning modules are checked for proper functioning.
Remedy:
Wait until the robot has finished checking the cleaning modules. This can take up to 30s
Cleaning modules check
Cause:
Cleaning modules are checked for proper functioning.
Remedy:
Wait until the robot has finished checking the cleaning modules. This can take up to 30s
Severe vacuum drop
Cause:
Remedy:
Check if vacuum hose is tightly connected to recovery tank and squeegee. Check vacuum hose, squeegee and squeegee blades for damages. Check if water is picked up correctly.
Severe vacuum drop
Cause:
Remedy:
Check if vacuum hose is tightly connected to recovery tank and squeegee. Check vacuum hose, squeegee and squeegee blades for damages. Check if water is picked up correctly.
Vacuum system error
Cause:
Remedy:
Check vacuum hose and squeegee for clogging and damages.
Vacuum system error
Cause:
Remedy:
Check vacuum hose and squeegee for clogging and damages.
Brush motor overload
Cause:
Remedy:
Check if brushes are in good condition and can rotate freely.
Brush motor overload
Cause:
Remedy:
Check if brushes are in good condition and can rotate freely.
Dirt water tank full
Cause:
Float switch in the waste water tank is activated because of open tank lid or full waste water tank.
Remedy:
Drain dirt water tank.
Dirt water tank full
Cause:
Float switch in the waste water tank is activated because of open tank lid or full waste water tank.
Remedy:
Drain dirt water tank.
No fresh water flow
Cause:
Remedy:
No fresh water is applied on the floor. Clean fresh water filter and water distribution channel of brush deck. If error persists after restart of the robot, call the Service.
No fresh water flow
Cause:
Remedy:
No fresh water is applied on the floor. Clean fresh water filter and water distribution channel of brush deck. If error persists after restart of the robot, call the Service.
General | |
Autonomous travel speed (max.) | 2,7 (4,3) mi/h (km/h) |
Manual travel speed manual (max.) | 3,4 (5,5) mi/h (km/h) |
Autonomous theoretical surface coverage | 27749.4 (2578) ft2/h (m2/h) |
Manual theoretical surface coverage | 35488.6 (3297) ft2/h (m2/h) |
Surface coverage per tank filling | 19730.2 (1833) ft2/h (m2/h) |
Fresh/waste water tank volume | 14.5 (55) gal (l) |
Detergent tank volume (Option Dose) | 1.3 (5) gal (l) |
Detergent dosing | 0...3 % |
Water dosing | 0...0,71 (0...2,7) gal/min (l/min) |
Coarse dirt basket volume | - l |
Dimensions | |
Length | 41.8 (1062) in (mm) |
Width without suction bar | 29.5 (750) in (mm) |
Width suction bar | 31.1 (790) in (mm) |
Height | 45.7 (1161) in (mm) |
Working Width | 23.6 (600) in (mm) |
Working Width with side brushes | - in (mm) |
Autonomous passage width (min.) | 39.4 (1000) in (mm) |
Autonomous edge clearance (min.) | 3.9 (100) in (mm) |
Packaging dimensions lxwxh | 45.7x34.6x54.9 (1165x880x1395) in (mm) |
Tyres | |
Front wheel, width | 1,3 (32) in (mm) |
Front wheel, diameter | 3,9 (100) in (mm) |
Rear wheel, width | 3.1 (80) in (mm) |
Rear wheel, diameter | 7.9 (200) in (mm) |
Weight | |
Approved total weight | 628.3 (285) lbs (kg) |
Net weight (transport weight) | 520.3 (236) lbs (kg) |
Brush pressure, max. | 61.4 (273) lbf (N) |
Brush contact pressure, max. | 182.3 (1962) N/ft2 (N/m2) |
Surface pressure | |
Steering roller | 394 (0,61) N/in2 (N/mm2) |
Rear wheel | 342 (0,53) N/in2 (N/mm2) |
Device performance data | |
Number of batteries | 2 |
Nominal voltage, Li-Ion | 25,6 V |
Battery capacity, Li-Ion | 160 Ah (5 h) |
Mean power input | 1600 W |
Driving motor power | 2x280 W |
Suction Turbine Power | 630 W |
Brush Drive Power | 2x450 W |
Running time with full battery | 3,5 h |
Protection type | IPX3 |
Suction | |
Suction Power, Airflow | 4.4...5.9 (16,8...22,2) gal/s (l/s) |
Negative Pressure (max.) | 1.5...1.9 (0.101...0.132) psi (bar) |
Cleaning Brushes | |
Brush Diameter | 2x300 in (mm) |
Brush length | - in (mm) |
Brush rotation speed | 150 1/min |
Internal charger | |
Rated voltage | 100...240 V |
Current consumption | 9,9-4,7 A |
Power input | 0,9-1,1 kW |
Frequency | 50-60 Hz |
Power | 960 W |
Charging current | 40 A |
Battery charging time | 5,25 h |
Environmental conditions | |
Permissible temperature range | 41...104 (5...40) °F (°C) |
Water temperature max. | 122 (50) °F (°C) |
Waste water tank flushing system water pressure | 145 (10) psi (bar) |
Relative humidity | 20...90 % |
Incline | |
Max. working area slope | 6 % |
Determined values according to EN 60335-2-72 | |
Hand-arm vibration value | 0.1 (0,3) ft/s2 (m/s2) |
Uncertainty K | 0,2 dB(A) |
Sound level LpA | 69 dB(A) |
Uncertainty KpA | 2 dB(A) |
Sound power level LWA + Uncertainty KWA | 84 dB(A) |
General | |
Autonomous travel speed (max.) | 2,7 (4,3) mi/h (km/h) |
Manual travel speed manual (max.) | 3,4 (5,5) mi/h (km/h) |
Autonomous theoretical surface coverage | 25456.6 (2365) ft2/h (m2/h) |
Manual theoretical surface coverage | 32560.8 (3025) ft2/h (m2/h) |
Surface coverage per tank filling | 19730.2 (1833) ft2/h (m2/h) |
Fresh/waste water tank volume | 14.5 (55) gal (l) |
Detergent tank volume (Option Dose) | 1.3 (5) gal (l) |
Detergent dosing | 0...3 % |
Water dosing | 0...0,71 (0...2,7) gal/min (l/min) |
Coarse dirt basket volume | 2 l |
Dimensions | |
Length | 41.8 (1062) in (mm) |
Width without suction bar | 29.5 (750) in (mm) |
Width suction bar | 31.1 (790) in (mm) |
Height | 45.7 (1161) in (mm) |
Working Width | 21.7 (550) in (mm) |
Working Width with side brushes | 30.2 (768) in (mm) |
Autonomous passage width (min.) | 39.4 (1000) in (mm) |
Autonomous edge clearance (min.) | 3.9 (100) in (mm) |
Packaging dimensions lxwxh | 45.7x34.6x54.9 (1165x880x1395) in (mm) |
Tyres | |
Front wheel, width | 1,3 (32) in (mm) |
Front wheel, diameter | 3,9 (100) in (mm) |
Rear wheel, width | 3.1 (80) in (mm) |
Rear wheel, diameter | 7.9 (200) in (mm) |
Weight | |
Approved total weight | 628.3 (285) lbs (kg) |
Net weight (transport weight) | 507.1 (230) lbs (kg) |
Brush pressure, max. | 40,7 (181) lbf (N) |
Brush contact pressure, max. | 730 (7858) N/ft2 (N/m2) |
Surface pressure | |
Steering roller | 394 (0,61) N/in2 (N/mm2) |
Rear wheel | 342 (0,53) N/in2 (N/mm2) |
Device performance data | |
Number of batteries | 2 |
Nominal voltage, Li-Ion | 25,6 V |
Battery capacity, Li-Ion | 160 Ah (5 h) |
Mean power input | 1600 W |
Driving motor power | 2x280 W |
Suction Turbine Power | 630 W |
Brush Drive Power | 600 W |
Running time with full battery | 3,5 h |
Protection type | IPX3 |
Suction | |
Suction Power, Airflow | 4.4...5.9 (16,8...22,2) gal/s (l/s) |
Negative Pressure (max.) | 1.5...1.9 (0.101...0.132) psi (bar) |
Cleaning Brushes | |
Brush length | 21.6 (550) in (mm) |
Brush rotation speed | 1350 1/min |
Internal charger | |
Rated voltage | 100...240 V |
Current consumption | 9,9-4,7 A |
Power input | 0,9-1,1 kW |
Frequency | 50-60 Hz |
Power | 960 W |
Charging current | 40 A |
Battery charging time | 5,25 h |
Environmental conditions | |
Permissible temperature range | 41...104 (5...40) °F (°C) |
Water temperature max. | 122 (50) °F (°C) |
Waste water tank flushing system water pressure | 145 (10) psi (bar) |
Relative humidity | 20...90 % |
Incline | |
Max. working area slope | 6 % |
Determined values according to EN 60335-2-72 | |
Hand-arm vibration value | 0.1 (0,3) ft/s2 (m/s2) |
Uncertainty K | 0,2 dB(A) |
Sound level LpA | 69 dB(A) |
Uncertainty KpA | 2 dB(A) |
Sound power level LWA + Uncertainty KWA | 84 dB(A) |
Radio technology | Band | Frequency | Transmission power |
|---|---|---|---|
WLAN | 2412 - 2472 | max. 100 | |
LTE | B1 | 1920 - 1980 | max. 250 |
B7 | 2500 - 2570 | max. 250 | |
B8 | 880 - 915 | max. 250 | |
B20 | 820 - 832 | max. 250 | |
B38 | 2570 - 2620 | max. 250 | |
B41 | 2496 - 2690 | max. 250 |
Your device must be registered so that we can help you with any questions or problems. You can register your device at www.karcher-register.com if you are located in the USA, at www.karcher.com/ca if you are located in Canada, or at www.karcher.com/mx if you are located in Mexico.
In the case of a warranty claim, you can contact customer support. Please see the contact information listed below for either the USA, Canada, or Mexico. You MUST provide your proof of purchase in order to file a warranty claim either via email, phone, or fax.
You can contact our Customer Service department by telephone on 1-800-537-4129 or via the website www.karcher-help.com.
You can contact our Customer Service department by phone at 01-800-024-13-13 or via the website at www.karcher.com/mx.
You can contact our Customer Service department by phone at 1-800-465-4980 or via the website at www.karcher.com/ca/support.
The scope of delivery for the appliance is shown on the packaging. During unpacking, check the contents for completeness. If any accessories are missing or in the event of any shipping damage, please notify our Customer Service department as stated above either by phone or via the website.