BRC 40/22 C
59785370 (03/26)
59785370 (03/26)
 Read these original operating instructions and the enclosed safety instructions before using the device for the first time. Proceed accordingly.
Keep both books for future reference or for future owners.
Before using the device for the first time, read and observe these operating instructions and the accompanying safety informations for brush cleaning units, 5.956-251.0.
Leaking waste or fresh water on sloping surfaces
Injury due to slipping
The device may only be operated when all the petrol caps are closed.Indication of an imminent threat of danger that will lead to severe injuries or even death.
Indication of a potentially dangerous situation that may lead to severe injuries or even death.
Indication of a potentially dangerous situation that may lead to minor injuries.
Indication of a potentially dangerous situation that may lead to damage to property.
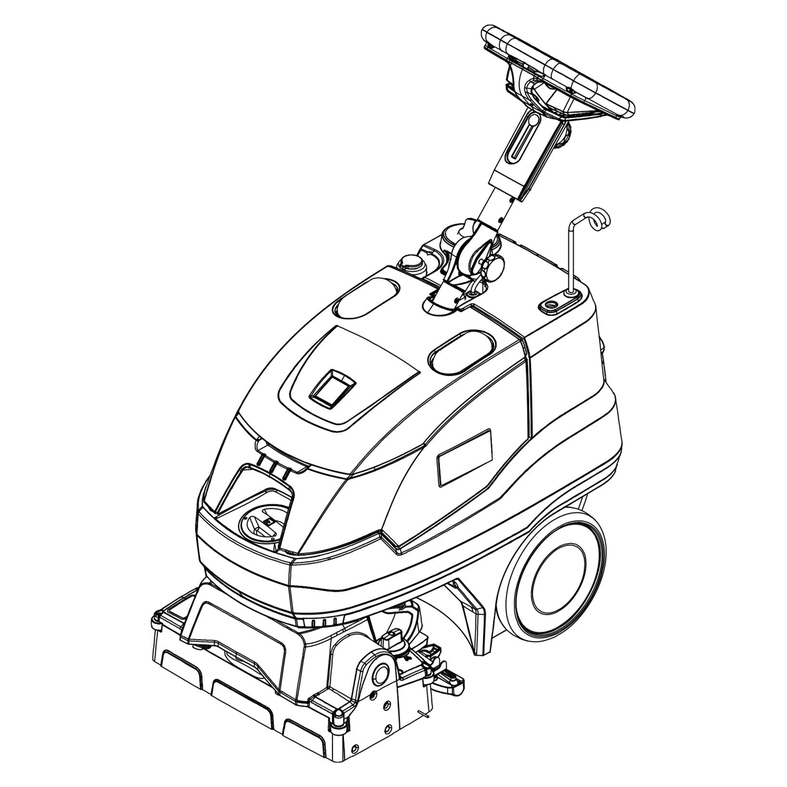
This carpet cleaner is used for wet cleaning carpets. The device sprays cleaning solution from the fresh water tank onto the floor to be cleaned, works the cleaning solution in with a roller brush and sucks up dirt and used cleaning solution into the waste water tank.
The cleaning solution is made up of fresh water and detergent.
The device can be adapted to the respective cleaning task by selecting a suitable cleaning programme.
Intermediate cleaning
The detergent solution is sprayed on and brushed in. After drying, the dirt bound by the detergent is extracted in a second procedure.
Basic cleaning
The cleaning solution is sprayed on, brushed in, and, in the same procedure, sucked in with the dissolved dirt.
The working width and the capacity of the fresh and waste water tanks (see "Technical data") enable effective cleaning with a long working time.
Use the device only in accordance with the information in these operating instructions.
This device is suitable for commercial use, e.g. in hotels, schools, hospitals, factories, shops, and offices.
Only use the device for cleaning hard surfaces that are not sensitive to moisture and polishing.
Do not use the device for cleaning frozen floors (e.g. in cold stores).
Do not use the device on deep woollen carpets.
Only equip the device with original accessories and spare parts.
Only use the device for cleaning indoor floors.
The brush drive switches off when the safety switch is released.
 The packing materials can be recycled. Please dispose of packaging in accordance with the environmental regulations.
 Electrical and electronic devices contain valuable, recyclable materials and often components such as batteries, rechargeable batteries or oil, which - if handled or disposed of incorrectly - can pose a potential danger to human health and the environment. However, these components are required for the correct operation of the device. Devices marked by this symbol are not allowed to be disposed of together with the household rubbish.
Current information on content materials can be found at: www.kaercher.de/REACH
The scope of delivery for the appliance is shown on the packaging. Check the contents for completeness when unpacking. If any accessories are missing or in the event of any shipping damage, please notify your dealer.
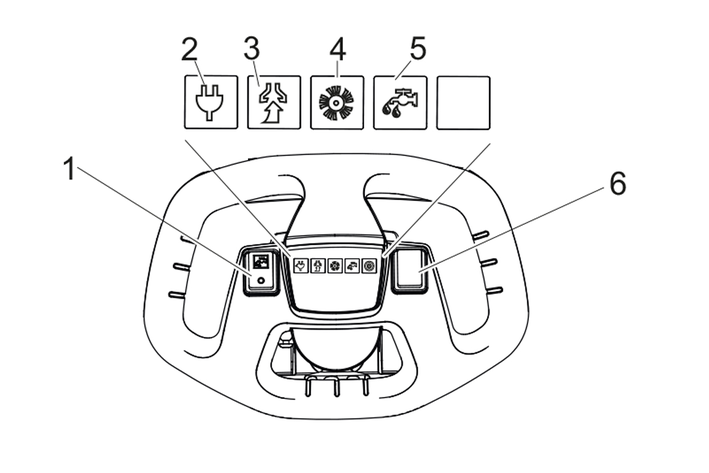
Green: Suction turbine in operation
Red, flashing: Malfunction
Green: Forward rotation direction
Orange: Reverse rotation direction
Red, flashing: Malfunction
Green: Detergent pump in operation
Red, flashing: Malfunction
Press the steering wheel downward so that the device lifts up towards the front.
The parking support swivels downwards.Release the steering wheel.
The device is standing on the parking support.The roller brush is unloaded and is protected from deforming.Push the device forwards.
The parking support swivels upwards.Health risk due to detergent
Improper use of detergents poses a health risk to the user.
Only use detergents properly and observe all safety instructions provided with the detergent and the safety instructions.Risk of damage from detergents
If detergents are used incorrectly, there is a risk of damage to the device and the surface to be cleaned.
Use only recommended detergents that are approved for this device.When using other detergents, the operator bears the increased risk regarding operational safety, accident hazards, and reduced service life of the device. Only use detergents free of solvents, hydrochloric acid and hydrofluoric acid.Do not use heavily foaming detergent.
Select a suitable cleaning detergent:
Application | Detergent |
|---|---|
| Deep carpet cleaning | RM 764 liquid |
Intermediate carpet cleaning | RM 768 iCapsol |
For further information, please observe the product information sheet for the relevant detergent.
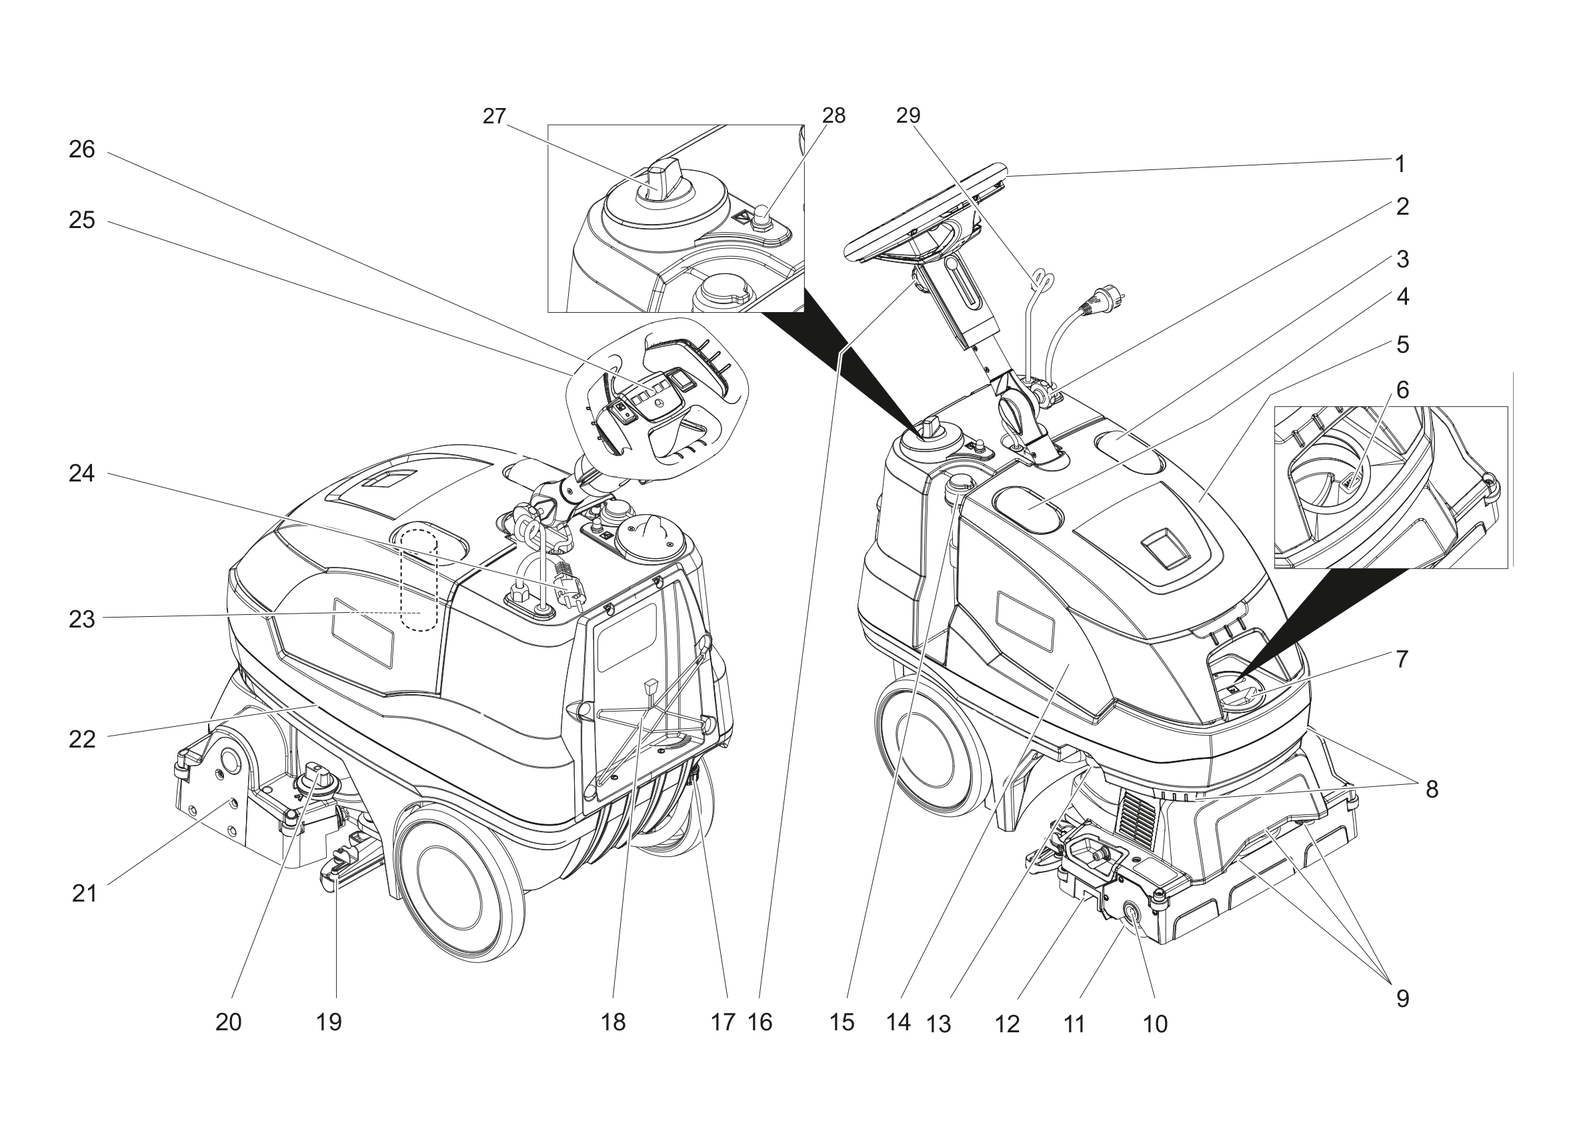
Open the fresh water filling hole.
Fill the fresh water tank with water (max. 50 °C) (observe the maximum filling level indicator and leave space for detergent).
Add the detergent.
Always pour in the water first and then the detergent to avoid foaming.
Remove the fresh water tank cap.
Danger from cleaning solution
Risk of damage
Before using the device, check the object to be cleaned for colour fastness and water resistance in an inconspicuous place.1. Adjust the main handle to a comfortable working position.
2. Before cleaning, remove loose dirt with a vacuum cleaner.
3. Plug the mains plug into a mains socket.
4. Set the brush height to the correct height for low-pile or high-pile carpets.
For proper operation, the brush must touch the carpet.
If the circuit breaker is tripped, lift the brush to prevent damage to the motor or carpet.
5. Press the Spray on detergent button.
Observe the smart speed indicator.
6. Release the button about 30 cm before the end of the cleaning cycle.
Loosen the star knob height adjustment to adjust the steering wheel.
Set the steering wheel to the desired height.
Tighten the star knob again.
Push the appliance to the work station.
Fold the parking support out.
Set the twist grip for the brush contact pressure to the recommended value.
Recommended setting:
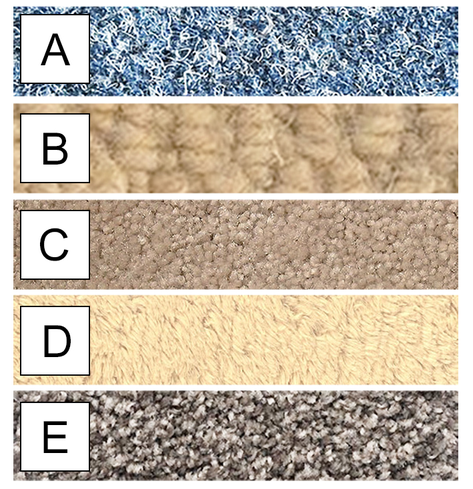
A | Needlepunch carpet | 2 (3) |
B | Loop pile carpet, flat | 3 (4) |
C | Velour, cut pile, flat | 1...2* |
D | Plush, high pile, velvety | 1...2* |
E | Cut pile, twisted | 1...2* |
(X) at too low of propulsion
* depending on the fibre height
Fold the parking support in.
Switch on the appliance on the carpet to be cleaned.
If support is present while the brush drive is being pushed forward, the adjustment is correct.
If no support is noticeable when you push, increase the setting and repeat the procedure.
If the indicator lamp for the brush drive shows a malfunction after a few seconds of operation, reduce the setting.
Carpet | Operating duration, minutes | |
Intermediate cleaning | Basic cleaning | |
Needlepunch carpet | 50...60 | 8...10 |
Loop pile carpet, flat | 40...50 | 8...10 |
Velour, cut pile, flat | 40...50 | 6...8 |
Plush, high pile, velvety | 25...30 | 2...3 |
Cut pile, twisted | 25...30 | 2...3 |
A pause in operation of 10 minutes must be adhered to after the maximum operating duration so the device can cool down.
During the pause in operation, the waste water tank and the coarse dirt container can be emptied, the brushes checked and the fresh water tank topped up.
Risk of damage to the floor covering
The floor covering can be damaged if the device is operated on the spot with the brush drive switched on.
Only operate the device while moving and not continuously on the same area.Attach the extension cable to the cable clips for strain relief.
First connect the extension cable to the mains plug and then to a mains socket.
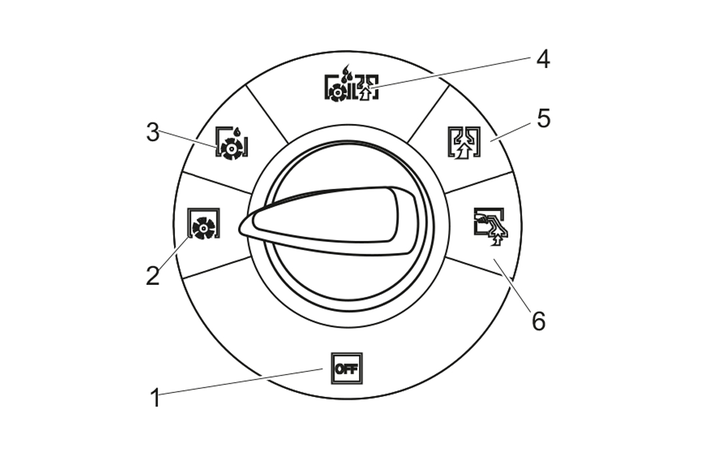
Turn the program selection switch to the desired function.
Switch on the cleaning solution switch if necessary.
Pull the safety button to the steering wheel, the selected functions are switched on.
Push the device forwards until the parking support folds in and the cleaning head touches the floor.
Move the device over the surface to be cleaned.
If the brush rotation direction switch on the steering wheel is actuated, the device also moves backwards.
Use the right-hand side of the device for cleaning close to the edge.
Risk of damage to the drive and floor covering
An incorrectly set contact pressure can damage the drive and the floor covering.
Reduce the contact pressure if the brush drive indicator light flashes red after a short operating duration.While working, keep an eye on the sight glass for airflow.
The device is equipped with transparent covers that make it easier for the operator to see the dirty solution and the suction air flow.
Observe the suction cover during operation.
Large quantities of water or foam entering the suction system can damage the suction motor.
Switch the machine off immediately. Empty the waste water tank and/or add defoamer.After cleaning, set the programme switch to Off, return the brush to its storage position and disconnect the mains plug.
Empty the waste water tank via the drain hose and clean with cold water.
Empty and clean the fresh water tank.
Set the steering wheel to reverse movement.
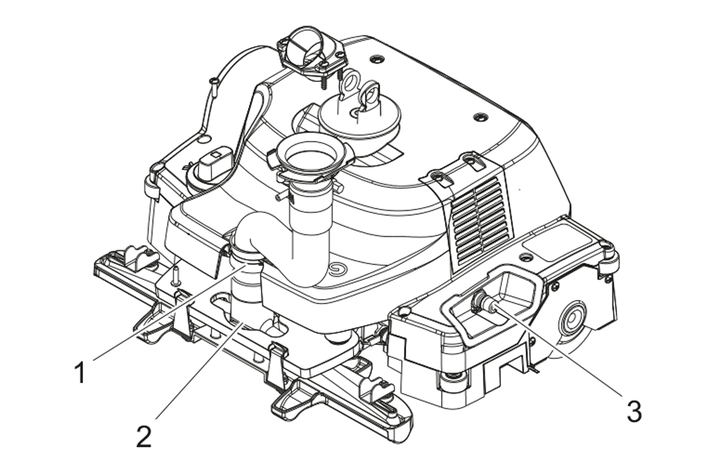
Pull the suction hose off the suction bar.
Connect the suction hose of the device to the suction hose of the additional tool.
Connect the hose for the cleaning solution of the additional tool to the coupling on the cleaning head.
An adapter is required for connection (see "Accessories and spare parts").
Turn the programme selection switch to the additional tool position.
Turn on the cleaning solution switch.
Perform cleaning with the additional tool.
Risk of damage to the brush
The brush can become permanently deformed if the device is placed on it.
Only park the device on the folded-out parking support.Let go of the safety button.
Move the device 1-2 metres forwards to suck out the residual water.
Turn the programme selection switch to "OFF".
Fold the parking support out.
Park the device.
Environmental pollution through waste water
Potential environmental pollution due to improper disposal of waste water into the sewage system.
Observe the local waste water treatment regulations and act accordingly.If the waste water tank is full, set the programme switch to Off.
Move the device next to a suitable drain.
Remove the waste water tank cover.
Remove the waste water drain hose from its holder and route it to a suitable disposal facility.
The drain hose is equipped with a dosing device. The waste water flow can be regulated by squeezing the soft section of the dosing device.
Press the dosing device together.
Remove the dosing device cover.
Drain the waste water by opening the dosing valve.
After draining, rinse the waste water tank with clear water.
The waste water tank can also be removed and carried separately to the disposal facility.
Risk of injury due to heavy waste water tank.
The waste water tank is very heavy when full (see "Technical data")
Take the weight into account when carrying and use suitable aids for transport if necessary.Environmental pollution due to detergent solution!
Potential environmental pollution due to improper disposal of detergent solution into the sewage system.
Observe the local waste water treatment regulations and act accordingly.Move the device to a suitable drain.
Push down the cleaning solution coupling to drain the fresh water.
Pull off the hose, swivel it downwards and guide it over the disposal unit.
Set the programme switch to OFF.
Move the device to an appropriate disposal location.
Drain the water reservoirs.
Fill the fresh water tank with approx. 4 litres of water (max. 50 °C) and rinse the spray system by pressing the Cleaning solution button.
Pull the mains plug out of the socket.
Remove the cleaning solution hose from the hose nipple and drain the cleaning solution.
Clean the cleaning solution filter.
Rinse the waste water tank with clear water.
Tilt the device backwards and clean the cleaning head and suction bar.
Danger of frost
Incompletely emptied devices can be destroyed by frost.
Completely empty the device and accessories.Protect the device from frost.Empty the fresh and dirt water tanks.
Park the device in a frost-protected room.
The steering column can be folded down to reduce the space required for transport and storage.
Release the star-knob for the transport position.
Pivot the steering wheel all the way forward.
Tighten the star-knob.
Risk of injury and damage due to device weight
The weight of the device poses a health risk when lifting and a risk of damage due to uncontrolled movement.
Only carry the device with two people or use a suitable aid and observe the weight of the device when lifting and transporting it (see "Technical data")Remove the brush to avoid damage to the brushes.
When transporting in vehicles, secure the device against slipping and tipping over according to the applicable guidelines.
Risk of injury and damage due to device weight
The weight of the device poses a health risk when lifting.
Only carry the device on stairs with two people and observe the weight of the device when lifting and transporting it (see "Technical data")Adjust the steering wheel to the highest position.
One person holds the device by the two front handles under the fresh water tank.
The second person holds the device by the steering wheel.
Do not carry the device by the cleaning head, as this can cause the device to swing around the steering column.
Failure to observe the weight
Risk of injury and damage
Be aware of the weight of the device during transport and storage.Store the device indoors only.
Risk of damage to the device due to leaking water.
Empty the waste water tank and the fresh water tank before working on the device.Park the device on a level surface.
Risk of damage!
Risk of damage to the device due to improper cleaning.
Do not spray the device with water and do not use aggressive detergents.Before starting work
Check the power cord, extension cable and hoses for damage before each start-up.
Check the spray pattern of the nozzle.
Do not use needles, wires etc. to clean the nozzles as this could negatively affect the spray pattern.
After work
Empty the waste water tank and rinse with clear water.
Check the covers and seals for damage.
Check the screen and float ball in the waste water tank and clean if necessary.
Clean the brush.
Check the brush for wear and damage, replace if necessary (see "Maintenance work").
Remove the coarse dirt container and empty it.
Check the suction bar for soiling and clean it if necessary.
Check the suction bar for mobility.
Check the squeegee blade of the suction bar for wear and replace them if necessary (see "Maintenance work").
Rinse out the suction hose.
Rinse the fresh water tank and spray system with about 5 litres of clear water.
Run the suction turbine for at least 1 minute.
Clean the exterior of the device with a damp cloth. If necessary, a little mild washing lye can be used.
Park the device with the waste water tank lid open to prevent odours from forming.
Check all hoses and seals for damage. Have defective parts replaced by Customer Service.
Take out the brush and clean it thoroughly.
Clean the sight glass for waste water.
Check the suction bar and suction lips for damage.
Check the wheels under the cleaning head for contamination and clean if necessary.
Clean the fresh water filter.
Have the prescribed inspection carried out by the customer service.
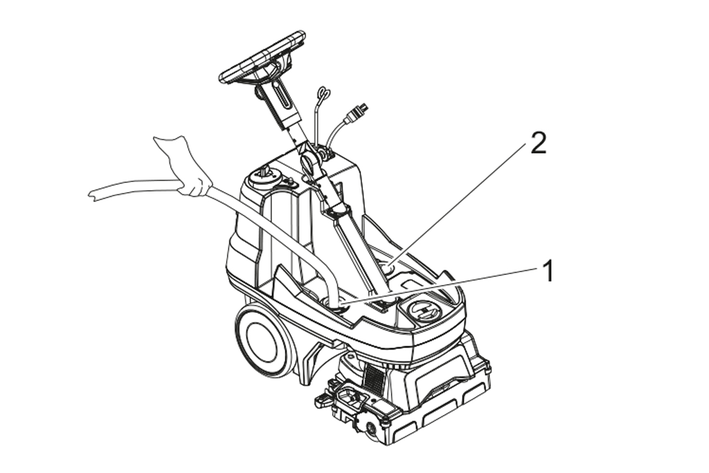
Remove the waste water tank.
Insert the water hose into the suction hose.
Risk of damage to the suction turbine
Water can enter the suction turbine via the suction channel and damage it.
Ensure that no water enters the suction turbine suction channel during rinsing.Rinse the suction hose and suction bar with a strong water stream.
The suction bar can be removed for cleaning.
Remove the waste water tank.
Turn the steering wheel to reverse and tilt the device backwards.
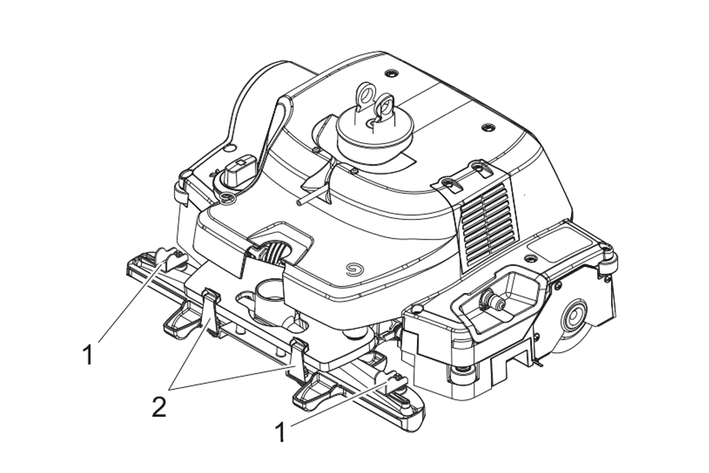
Pull the suction hose off the suction bar.
Release both clips
Remove the suction bar.
Open the rotatable brackets and take off the cleaning nozzle.
The brush must be replaced if it is so heavily worn that the front edge of the cleaning head touches the ground.
Remove the waste water tank.
Tilt the device to the rear.
Press the roller brush unlocking button, swivel the roller brush downwards and pull it off the driver.
Fit the new brush onto the driver and engage on the opposite side.
To ensure a reliable operation of the device, maintenance contracts can be concluded with the competent Kärcher sales outlet.
Risk of damage to the device due to leaking water.
Empty the waste water tank and the fresh water tank before working on the device.Contact Customer Service in the case of malfunctions that cannot be corrected using this table.
Brush drive indicator lamp | Rectification |
|---|---|
Lights up red | Insert the roller brush |
Flashes red two times, device stops | Reduce the brush contact pressure |
Flashes red 3 times, device stops | Clean the roller brush |
Flashes red 4 times, device stops | Notify Customer Service |
Flashes red 5 times, device stops | Allow the device to cool down, reduce the brush contact pressure |
Flashes red 6 times, device stops |
Malfunctions that are not displayed
Malfunction | Rectification |
|---|---|
Device does not start | Insert the mains plug into the mains socket |
Press to reset the overload fuse | |
Check the building fuse | |
Poor suction performance | Empty the waste water tank and clean the float ball |
Cleaning the suction bar | |
Check the seals on waste water tank and sight glass | |
Check the suction hose for clogging | |
Check the suction hose for tightness, replace necessary | |
Low water quantity | Clean nozzles, check for damage, replace if necessary |
Clean the cleaning solution filter | |
Roller brush does not turn | Set the programme selector switch to the desired cleaning programme |
Check if the roller brush is blocked by foreign bodies and remove the foreign bodies if necessary. |
The warranty conditions issued by our relevant sales company apply in all countries. We shall remedy possible malfunctions on your appliance within the warranty period free of cost, provided that a material or manufacturing flaw is the cause. In a warranty case, please contact your dealer (with the purchase receipt) or the next authorised customer service site.
Further information can be found at: www.kaercher.com/dealersearch
Further warranty information (if available) can be found in the service area of your local KÄRCHER website under "Downloads".
General | |
Theoretical surface performance | 500 m2/h |
Waste water tank capacity | 19 l |
Fresh water tank capacity | 22 l |
Spray detergent | 4 quick-change nozzles |
Dimensions | |
Length | 889 mm |
Width without suction bar | 470 mm |
Width suction bar | 406 mm |
Amount | 1118 mm |
Weight | |
Approved total weight | 64,6 kg |
Net weight (transport weight) | 42,6 kg |
Device performance data | |
Rated voltage | 220-240 V |
Mean power input | 1800 W |
50 Hz | |
Suction Turbine Power | 1200 W |
Brush Drive Power | 400 W |
Protection type | IPX4 |
Suction | |
Suction Power, Airflow | 47 l/s |
Negative Pressure (in Operation) | 29 (290) kPa (mbar) |
Width suction bar | 16-inch injection moulded plastic with spring-loaded downward pressure |
Cleaning Brushes | |
Brush Diameter | 96 mm |
Brush rotation speed | 1100 1/min |
Environmental conditions | |
Permissible temperature range | 5...40 °C |
Water temperature max. | 50 °C |
Determined values in acc. with EN 60335-2-68 | |
Overall vibration value | <2,5 m/s2 |
Sound level LpA | 74 dB(A) |
Only use original accessories and original spare parts. They ensure that the appliance will run fault-free and safely.
Information on accessories and spare parts can be found at www.kaercher.com.
We hereby declare that the product named below complies with the relevant provisions of the directives and regulations listed. This declaration is invalidated by any changes made to the product that are not approved by us. The manufacturer shall bear sole responsibility for issuing of this declaration of conformity.
Product: Scouring and vacuum machine
Type: 1.008-xxx
Directives and Regulations2006/42/EC (+2009/127/EC)
2014/30/EU
2011/65/EU
Harmonised standards usedEN 60335-1
EN 60335-2-68
EN 55014-1: 2017 + A11: 2020
EN 55014-2: 1997+A1: 2001+A2: 2008
EN 61000-3-2: 2014
EN 61000-3-3: 2013
EN 62233: 2008
Name and addressDocumentation supervisor:
S. Reiser
Alfred Kärcher SE & Co. KG
Alfred-Kärcher-Str. 28 - 40
71364 Winnenden (Germany)
Tel.: +49 7195 14-0
Fax: +49 7195 14-2212

Winnenden, 25/12/01
The undersigned act on behalf of and with the authority of the Board of Directors.
Alfred Kärcher SE & Co. KG
Alfred-Kärcher-Str. 28 - 40
71364 Winnenden (Germany)
Ph.: +49 7195 14-0
Fax: +49 7195 14-2212

2-2-SC-A4-GS-AW04074